Grids, rulers & guides
When you digitize embroidery, accuracy is everything – stitch paths, spacing, and alignment all affect how a design runs on-machine and looks on fabric. Grids, rulers, and guides give you a precise visual framework so every point you place is deliberate and repeatable.
Used together, grids, rulers, guides, and snap give you a disciplined layout environment that translates directly into cleaner paths, fewer edits, and more professional stitchouts.
|
Benefit
|
Importance
|
|
Speed with confidence
|
Snap reduces micro-adjustments, so you place clean points the first time.
|
|
Consistent spacing
|
Keep satin widths, column offsets, and object gaps uniform across the design.
|
|
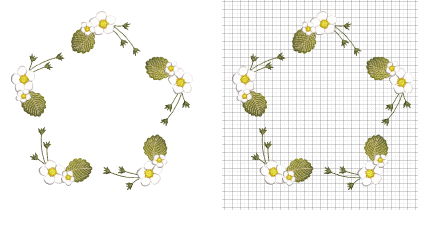
Perfect symmetry & repetition
|
Mirror motifs, tile repeats, or border elements on exact intervals.
|
|
Production accuracy
|
Align to hoop templates and fabric grain – reduce registration issues and trims.
|
|
Editable by design
|
A stable framework makes later edits predictable – no compounding misalignments.
|
Usage tips
3Choose a grid spacing that matches the task – e.g. 1 mm for fine detail, 5–10 mm for layout.
3Adjust display colors for contrast against your artwork or fabric preview.
3Set a reference point early – design center or hoop origin – and work outward.
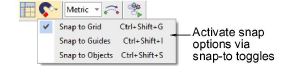
3Use the Snap options on the View toolbar to help place points and objects with absolute accuracy while digitizing. Hold Alt to temporarily override when you need free placement.
Related topics...
3Display grids, rulers & guides
3Ruler & guide display options
3Grid display options
3Snap options
3Set measurement units
3Measure distances on screen