
Click View > Show Grid to show or hide the grid. Right-click for settings.

Click View > Show Rulers & Guides to show or hide rulers and guides. Right-click for settings.

|
|
Click View > Show Grid to show or hide the grid. Right-click for settings. |
|
|
Click View > Show Rulers & Guides to show or hide rulers and guides. Right-click for settings. |
|
|
Use grid lines to help accurately align or size embroidery objects. Default grid spacing is 10mm x 10mm. Invoke rulers to accurately position and scale objects. The unit of measurement – mm or inches – defaults to the regional settings in the MS Windows® Control Panel.
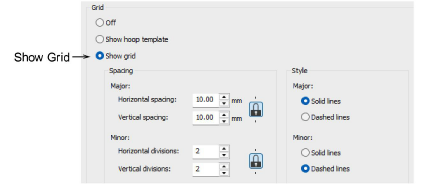
3Click the Show Grid icon or press Shift+G. Right-click for settings. You can change grid spacings and appearance in the Options dialog.
3Click the Show Rulers & Guides icon or press Ctrl+R.
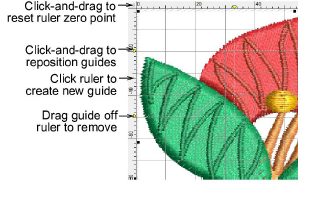
3Reset the ruler zero point by clicking and dragging the button in the top left-hand corner of the ruler.
3To create a guide, click either ruler – horizontal or vertical – and click-and-drag it into position. Multiple guides can be created and just as easily removed.
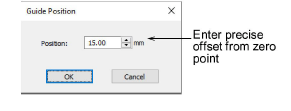
3For more accurate positioning of guides, double-click the yellow handle. In the Guide Position dialog, enter a precise distance from zero point and click OK.
3To remove guides selectively, drag the yellow guide handle off the design window. To remove all guides – horizontal, vertical, or both – right-click anywhere on the horizontal or vertical rulers to access a popup menu with the following options:

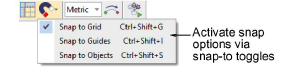
3Use the Snap options on the View toolbar to help place points and objects with absolute accuracy while digitizing. Hold Alt to temporarily override when you need free placement.
3You can change the color of grid and guidelines via the Background & Display Colors dialog.
3Grid, ruler, & guide display options
Products
EmbroideryStudio Add-ons
Solutions
Learning
Support
Connect
About Wilcom