Puede cargar ilustraciones vectoriales de diversos formatos mediante Modalidad gráficos para usarlas como trasfondos de digitalizacion en la digitalización manual o automática. Puede también usar esta técnica para insertar mapas de bits.
Nota: Se requiere registrar CorelDRAW® para que pueda ser usado por EmbroideryStudio. El registro proporciona CorelDRAW® membresía estándar que le da acceso a contenido – imágenes prediseñadas, fuentes, fotos de stock, plantillas – a través de Corel CONNECT.
1Cambie a Modalidad gráficos y haga clic en Importar en la barra de herramientas Estándar.
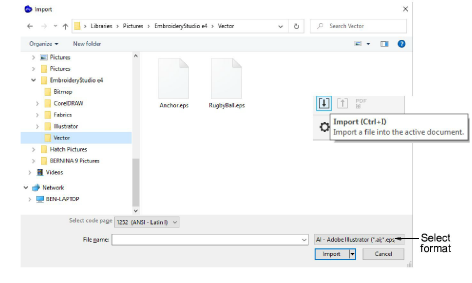
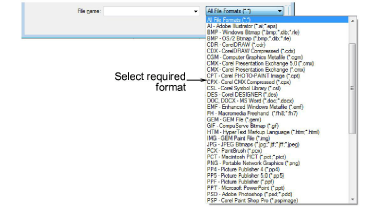
2Seleccione una carpeta y seleccione un archivo en la lista Archivos de tipo – p.ej., EPS.
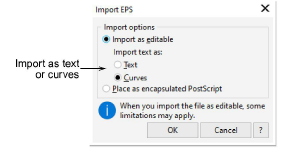
3Seleccione un archivo y haga clic en Importar. Se abrirá el diálogo Importar EPS. Se le solicita importar como solo texto o como curvas vectoriales.
4Posicione el cursor en la ventana de diseño y pulse Intro.
5Escoja una técnica de digitalización:
3Convertir los vectores a bordado: Vea Convertir objetos con Modalidad gráficos para más información.
3Cambie a Modalidad bordado y use la ilustración como un trasfondo de digitalización: Vea Métodos de digitalización para más información.
Nota: Si no puede ver la imagen que cargó en Modalidad bordado, asegúrese de que el icono Mostrar vectores esté activado.
Idea: Al sujetar imágenes de telón de fondo las mantiene en su lugar mientras usted digitaliza, transforma o reforma los objetos de bordado cercanos a ellas. Los objetos inmovilizados pueden soltarse en cualquier momento para modificarlos.
3Convertir diseños con Modalidad gráficos
3Auto digitalizar formas individuales
Productos
Complementos de EmbroideryStudio
Soluciones
Aprendiendo
|
Copyright ©2025 Wilcom Pty Ltd | Condiciones de uso | Política de privacidad |


