Create columns & borders
Digitize columns and borders of fixed width with the Column C tool.
To create columns and borders...
1Insert some artwork to use as a digitizing backdrop.
2Select a color and stitch type – e.g. Satin.
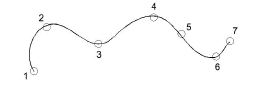
3Select Column C and mark corner or curve points around the outline of the shape.
3Click to enter corner points.
3Right-click to enter curve points.
4To close the shape, enter the last point on top of the first. Press Enter.
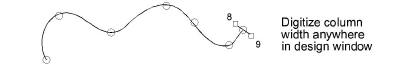
5Specify column width:
3To use the default width – as set in the Object Properties > Special > Column C docker – press Enter.
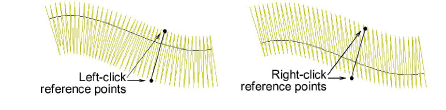
3To specify a width, mark two additional points. By default, stitches are positioned around the center of the digitized line.
3To specify an offset, right-click reference points instead of left-clicking.
6Press Enter to finish.
Usage tips...
3If you make a mistake while digitizing, press Backspace to delete the last point.
3Press Esc to undo all new points. Press Esc again to exit digitizing mode.
3The Show Column C width guide setting in the Options dialog activates a special cursor. This is useful when digitizing a border based on a background image.
3For fast, accurate alignment, adjust Snap settings via the Options dialog. To temporarily disable Snap options as you digitize, hold down the Alt key.
3Use Auto Scroll to scroll automatically within the design window while digitizing. Hold down the Shift key to temporarily deactivate Auto Scroll. Use the Ctrl+Shift+A key combination to quickly toggle Auto Scroll on/off.
3You can toggle between Column C and Digitize Run by pressing the Spacebar. See also Convert objects with CorelDRAW Graphics.
3If you want to resume digitizing without starting over, click the Continue Digitizing tool and select the object.
Related topics...
3Stitch Types
3Ruler & guide display options
3Snap options
3Scroll options
3Continue digitizing
3Reshape Column C objects