Digitizing outlines & details
EmbroideryStudio provides tools for creating outline stitching of varying thickness and styles. These tools place a row of stitching along a digitized line. They are typically used for adding outlines and details. They can also be used for decorative effect.
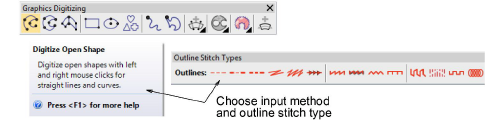
To digitize outlines and details...
3Select a suitable input tool together with an outline stitch type.
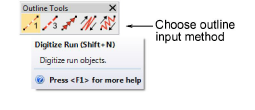
3Alternatively, choose a traditional outline input method from the Outline tools.
3In addition to Run and Triple Run, traditional methods include:
|
Tool
|
Usage
|
|

|
Use Motif Run to place a row of motifs along a digitized line.
|
|

|
Use Backstitch to place a row of backstitches along a digitized line.
|
|

|
Use Stemstitch to place a row of stemstitches along a digitized line.
|
3Choose a color from the Color toolbar. You can change colors at any time.
3Digitize the shape by marking reference points:
3Left-click for corner points.
3Right-click for curve points.
3To constrain the line to 15° increments, hold down Ctrl as you digitize.
3For a perfect circular arc, mark three points with a right-click.
3Where curves connect – either to a straight line or another curve – click to mark the connection point.
3Press Enter to finish.
3To view stitches better, use the View toolbar to turn on or off backdrops.
3Optionally, use Edit > Close Shape... commands to close an object using straight or curved points.
3Optionally, double-click the object to access object properties.
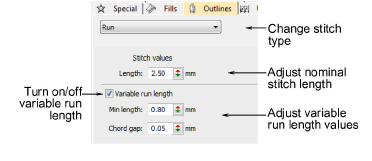
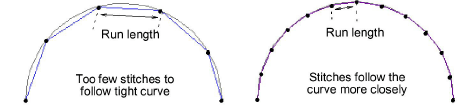
3To set a fixed stitch length, adjust the Length field. For sharp curves, reduce length – e.g. 1.8 mm – so that the stitches follow the line more closely. Alternatively, automatically shorten stitches to follow tight curves with the Variable Run Length option.
Usage tips...
3If you make a mistake, press Backspace to delete the last point.
3Press Esc to undo all new points. Press Esc again to exit digitizing mode.
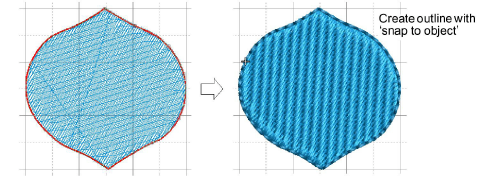
3For fast, accurate alignment, adjust Snap settings via the Options dialog. Use ‘snap to objects’ to precisely contour outlines to fill shapes.
3To temporarily disable Snap options as you digitize, hold down the Alt key.
3Use Auto Scroll to scroll automatically within the design window while digitizing. Hold down the Shift key to temporarily deactivate Auto Scroll. Use the Ctrl+Shift+A key combination to quickly toggle Auto Scroll on/off.
3If you want to resume digitizing without starting over, click the Continue Digitizing tool and select the object.
Related topics...
3Simple outlines
3Continue digitizing
3Thread selection
3Other general options
3View graphical components
3Grid, ruler, & guide display options
3Snap options
3Scroll options
3Minimizing connectors