|
|
Haga clic en Aro > Aro automático aro para indicarle al sistema que debe seleccionar un aro automáticamente. |
|
|
Haga clic en Aro > Aro automático aro para indicarle al sistema que debe seleccionar un aro automáticamente. |
La forma más simple para seleccionar el aro apropiado para un diseño es avisarle al sistema que debe seleccionarlo automáticamente. Aro automático encuentra el aro más pequeño que puede acomodar el diseño completo. La prestación Aro automático sólo selecciona aros de la lista Mis aros así que sólo sugiere los aros que usted ha preseleccionado cómo aquellos que se encuentran disponibles.
1Abra el diseño y haga clic en el icono Aro automático o acceda al comando por medio del menú Diseño > Aro automático menu. En la lista de aros disponibles Mis aros, EmbroideryStudio elije el aro más pequeño que acomoda el diseño actual.

2Si EmbroideryStudio no puede encontrar un aro apropiado, le solicita generar automáticamente un aro personalizado o añadir aros a Mis aros.
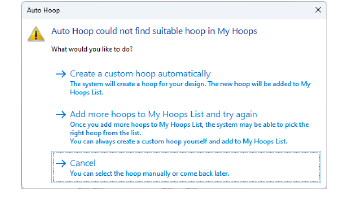
3Haga clic en Crear un aro personalizado automáticamente... si desea que EmbroideryStudio genere un aro. Creará un aro circular o rectangular redondeado que se acomode a las dimensiones del diseño y lo nombrará de acuerdo – p. ej.. ‘Rectángulo redondeado 158 x 129 mm’.
3Haga clic en Añadir más aros... si desea configurar o modificar la lista Mis aros de acuerdo con los aros disponibles.
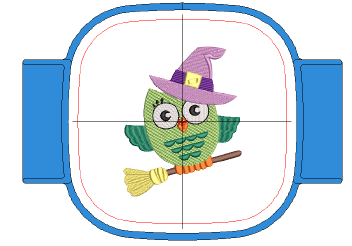
3El nombre del aro actual se muestra en la Barra de avisos.
3Seleccione Visualizar > Zoom > Hacer zoom en el aro o pulse Alt+0 para ver todo el aro en la ventana de diseño.
3Despliegue la Plantilla de aro mediante el diálogo Opciones o el menú Visualizar. La plantilla puede usarse para ayudar a posicionar el diseño dentro del aro.
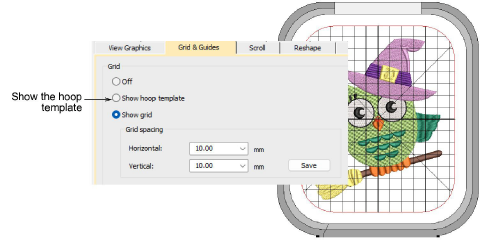
3Puede incluir la plantilla de aro en la hoja de trabajo de producción. Esto le permite recortar el diseño impreso y alinearlo dentro del aro. Use las marcas en la plantilla para alinearla con la plantilla de aro física.
3El aro seleccionado se guarda con el diseño en el formato de archivo nativo EMB. Cuando la máquina lee el archivo de máquina, el área de bordado está limitada por el tipo de aro seleccionado.
3Visualizar cuadrículas, reglas y guías
3Personalizar reportes de diseño
Productos
Complementos de EmbroideryStudio
Soluciones
Aprendiendo
|
Copyright ©2025 Wilcom Pty Ltd | Condiciones de uso | Política de privacidad |
