Use las líneas de la cuadrícula para ayudarse con precisión a alinear o ajustar el tamaño de los objetos de bordado. El espaciado de cuadrícula predeterminado es 10mm x 10mm. Despliegue las reglas para posicionar y dimensionar con exactitud los objetos. La unidad de medición – mm o pulgadas – depende de las configuraciones regionales en el Panel de control de MS Windows®.
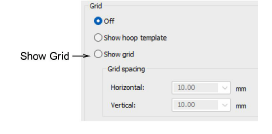
3Haga clic en el ícono Mostrar cuadrícula o pulse Mayús+G. Haga clic derecho para configuración. Puede cambiar el espaciado de cuadrícula, seleccionar un punto de referencia y active o desactive Ajustar a cuadrícula en el diálogo Opciones.
3Haga clic en el icono Mostrar reglas y guías o pulse Ctrl+R.
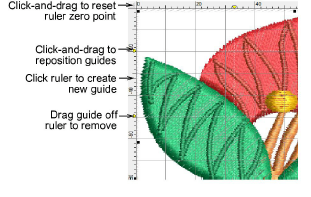
3Restablezca el punto cero de la regla haciendo clic y arrastrando el botón en la esquina superior izquierda de la regla.
3Para crear una guía, haga clic en una de las dos reglas – horizontal o vertical – y haga clic y arrástrela hasta su posición. Se pueden crear y eliminar guías múltiples con gran facilidad.
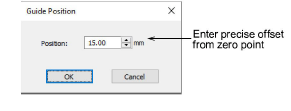
3Para un posicionamiento más exacto de las guías, haga clic dos veces en la manecilla amarilla. En el diálogo Posición de guía, introduzca una distancia exacta desde el punto cero y haga clic luego en Aceptar.
3Para eliminar una guía, arrastre la manecilla amarilla de guía fuera de la ventana de diseño.
3Opcionalmente, habilite la prestación Ajustar a... mediante el diálogo Opciones.
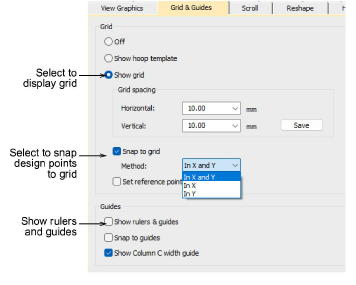
3Puede también cambiar el color de la cuadrícula y las guías mediante el diálogo Colores de fondo y pantalla.
3Opciones de visualización de cuadrícula
Productos
Complementos de EmbroideryStudio
Soluciones
Aprendiendo
|
Copyright ©2025 Wilcom Pty Ltd | Condiciones de uso | Política de privacidad |


