La herramienta Reformar objeto es de suma importancia en EmbroideryStudio. Úsela cuando quiera cambiar las formas de los objetos. Úsela también para editar los ángulos de puntada además de los puntos de entrada y salida.
1Seleccione el objeto y haga clic en Reformar objeto. Los puntos de control aparecen con la barra de herramientas Vistas de reformar.
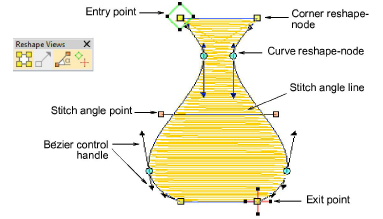
Idea: La mayoría de los puntos de control pueden ser añadidos, eliminados o movidos. Los puntos de esquina y de curva pueden intercambiarse. Los puntos de entrada y salida, sin embargo, no pueden eliminarse.
2Use la barra de herramientas Vistas de reformar para mostrar selectivamente los puntos de control.
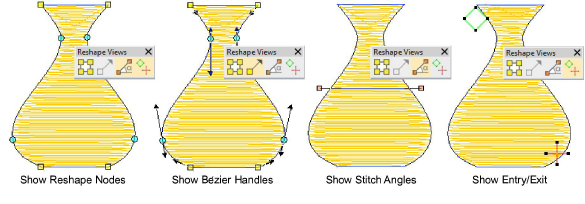
3Mostrar nodos de reforma: Use la combinación de atajos Alt+N para mostrar/ocultar. Vea Reformar objetos con nodos de reforma para más información.
3Mostrar manijas bézier: Vea Reformar objetos con controles Bézier para más información. Vea también Opciones reformar.
3Mostrar ángulos de puntada: Use la combinación de atajos Alt+A para mostrar/ocultar. Vea Ajustar ángulos de puntada para más información.
3Mostrar entrada/salida: Vea Ajuste puntos de entrada/salida para más información.
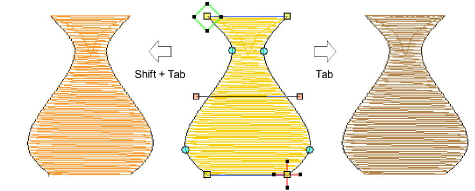
3Para ver el objeto siguiente o el anterior, pulse las teclas Tab o Mayús+Tab. Se confirman los cambios a los objetos.
3Reformar objetos con nodos de reforma
3Reformar objetos con controles Bézier
Productos
Complementos de EmbroideryStudio
Soluciones
Aprendiendo
|
Copyright ©2025 Wilcom Pty Ltd | Condiciones de uso | Política de privacidad |


