Ajuste el espaciado de cuadrícula dependiendo del tamaño del diseño con el que esté trabajando. Use la característica Encajar en cuadrícula para alinear objetos con las líneas de cuadrícula más cercanas. Las casillas controlan los mismos botones que la barra de herramientas Visualizar. La diferencia es que las selecciones que hace aquí afectan las configuraciones predeterminadas del sistem la siguiente vez que ejecuta EmbroideryStudio.
1Haga clic con el botón derecho en Mostrar cuadrícula. Se abrirá el diálogo Opciones > Cuadrícula y guías.
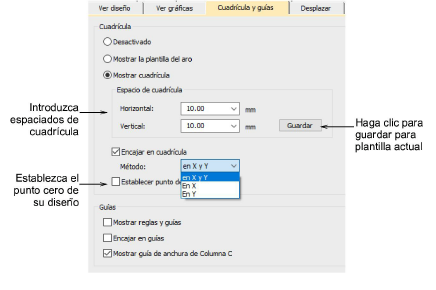
2Escoja un tipo de cuadrícula:
3Opcionalmente, seleccione visualizar Plantilla de aro. Las plantillas pueden usarse en lugar de cuadrículas. La plantilla, especialmente cuando se imprime en la hoja de trabajo, provee los medios para alinear el diseño en el aro en la posición correcta y con la orientación correcta.
3Alternativamente, seleccione la opciòn Mostrar cuadrícula. Esto activa las configuraciones de espaciado.
3Introduzca los valores de Espaciado de cuadrícula para líneas de cuadrícula verticales y horizontales. Para guardar el espaciado de cuadrícula en la plantilla actual, haga clic en Guardar.
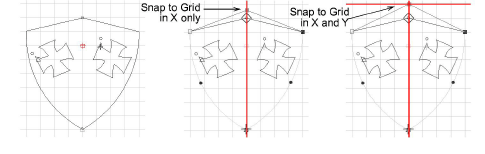
4Seleccione la casilla Encajar en cuadrícula como requiera. Los puntos de referencia, los puntos de control o los bordes de conducción de los objetos saltan a la cuadrícula y/o a las guías durante las operaciones de digitalización, ajuste de tamaño, reforma o posicionamiento.
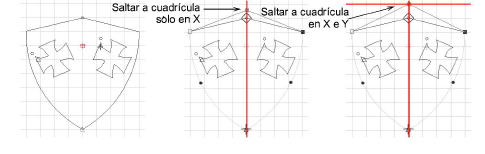
5Escoja un método de encajar. Puede escoger activar en el eje X o en el Y o en ambos.
6Seleccione la casilla Establecer punto de referencia para establecer el punto cero de la regla. Por ejemplo, puede establecer el punto de referencia de cuadrícula en el centro del diseño. Es más fácil y más rápido que desplazar el diseño entero. Cuando cierra el diálogo, se le solicita marcar el punto cero de su diseño.
Idea: Para desactivar temporalmente Encajar en cuadrícula mientras digitaliza, mantenga pulsada la tecla Alt.
3Visualizar cuadrículas, reglas y guías
3Centrar diseño y aro automáticamente
Productos
Complementos de EmbroideryStudio
Soluciones
Aprendiendo
|
Copyright ©2025 Wilcom Pty Ltd | Condiciones de uso | Política de privacidad |


