EmbroideryStudio provee un juego de herramientas dedicado para crear encuadres múltiples manualmente. Úselo si no puede lograr el efecto deseado con el método automático.
1Abra o cree el diseño grande o esquema de diseños que desea bordar.
2Verifique la secuencia de bordado con la herramienta Lista color-objeto y/o Simulador de puntada. Conocer la secuencia de bordado le ayuda a colocar aros en la mejor secuencia.
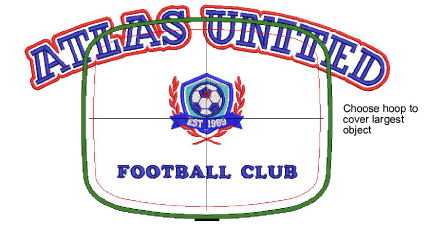
3Escoja el aro que desea usar. Como una operación de bordado puede usar solo un tamaño de aro, necesita escoger un aro en el que quepa el objeto más grande en el diseño.
4Cambie a la Modalidad de encuadre. Los objetos cubiertos – aquellos que caben completos en un aro – aparecen en puntadas verdes. Los objetos no cubiertos – aquellos que no caben – se muestran en puntadas negras.
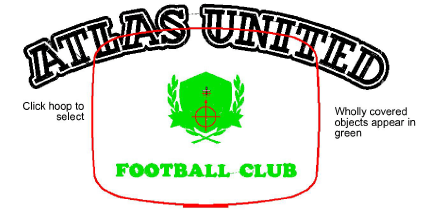
5Use la herramienta Seleccionar aro para seleccionar el contorno del aro y arrastrarlo hasta cubrir el primer objeto en el diseño.
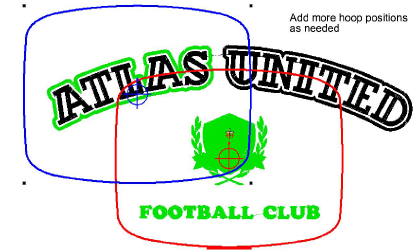
6Haga clic en el aro de nuevo y use las manijas de rotación para orientarlo como sea necesario. Alternativamente, use los controles en la barra de herramientas Aro para rotar por incrementos.
7Use las herramientas Añadir aro para añadir una o más posiciones de aro.
Trate de imitar la secuencia de bordado.
Nota: Tan pronto como se mueve un aro o se junta con otros, se desactiva el centrado automático, lo que quiere decir que el aro ya no se centra automáticamente alrededor de objetos en el diseño. Si elimina todos los aros en un diseño y crea uno nuevo, el centrado automático se reactiva.
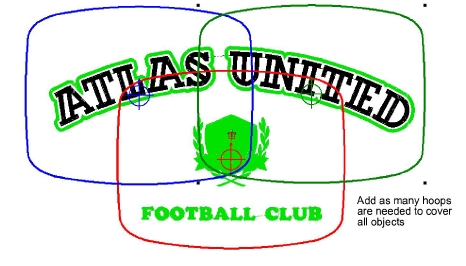
8Reposicione y rote aros adicionales hasta que cubran completamente todos los objetos en el diseño. Desplace con precisión los aros seleccionados a su posición usando las teclas de flecha.
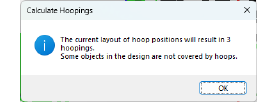
9Finalmente, haga clic en el icono Calcular configuraciones de aro para evaluar las configuraciones de aro que resultarán del trazado de aros actual.
Aunque un diseño esté completamente cubierto por posiciones de aro separadas, algunos objetos pueden permanecer sin cubrir. El mensaje de confirmación se lo dirá y los objetos descubiertos aparecerán en negro.
Nota: El tiempo que toma calcular los encuadres del diseño depende más del número de objetos y de las posiciones de los aros que del número de puntadas. Los diseños convertidos desde EXP, PES, HUS, etc, tendrán en general un mayor número de objetos que los diseños de bordado EmbroideryStudio nativos. Por lo tanto, estos diseños tomarán más tiempo para calcular. Sin embargo, aún con archivos EMB puros, si el diseño es complejo y grande y contiene muchas posiciones de aro, el cálculo tomará tiempo.
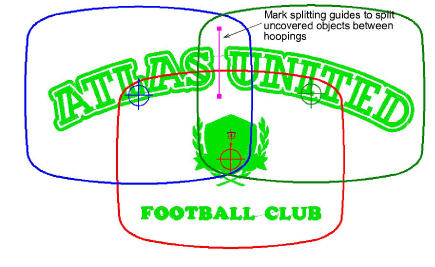
3Usa la herramienta Añadir línea divisoria para dividir los objetos que de otra manera no cabrían dentro de un encuadre.
3Opcionalmente, añada marcas de registro mediante la pestaña Opciones > Encuadres múltiples.
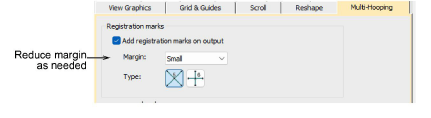
3Use la herramienta Vista previa de encuadres para verificar que las marcas de registro hayan sido añadidas. Si no han sido añadidas, significa que no hay suficiente traslape entre encuadres. Puede ya sea aumentar el traslape reposicionando. O reducir el margen para las marcas de registro en la pestaña Encuadres múltiples.
3Imprima una copia del diseño que muestre las posiciones de aro para ayudarse a bordarlo en el orden correcto de encuadres.
3Encuadres múltiples automáticos
3Dividir objetos entre encuadres
3Imprimir diseños con encuadres múltiples
Productos
Complementos de EmbroideryStudio
Soluciones
Aprendiendo
|
Copyright ©2025 Wilcom Pty Ltd | Condiciones de uso | Política de privacidad |


