EmbroideryStudio provee la barra de herramientas dedicada Modalidad encuadre que le permite especificar encuadres múltiples para diseños grandes tanto manual como automáticamente. La forma más fácil de definir las posiciones de aro es con la herramienta Colocación automática de aros. Tenga en mente que este método usa un algoritmo de software basado puramente en reglas. Funciona mejor con diseños simples.
1Abra o cree el diseño grande o esquema de diseños que desea bordar.
2Verifique la secuencia de bordado con la herramienta Lista color-objeto y/o Simulador de puntada. Esto le ayuda a colocar aros en la mejor secuencia de encuadres.
3Escoja el aro que desea usar. Como una operación de bordado puede usar solo un tamaño de aro, necesita escoger un aro en el que quepa el objeto más grande en el diseño.

4Cambie a la Modalidad de encuadre. Los objetos cubiertos – aquellos que caben completos en un aro – aparecen en puntadas verdes. Los objetos no cubiertos – aquellos que no caben – se muestran en puntadas negras.
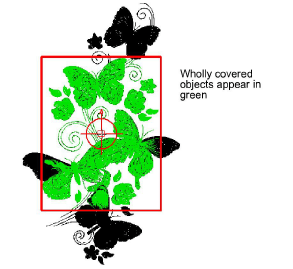
Nota: Ningún objeto de bordado puede seleccionarse o manipularse en Modalidad encuadre.
5Use las herramientas Colocación automática de aros para añadir posiciones de aro automáticamente. Estas se calculan de acuerdo a la secuencia de bordado.

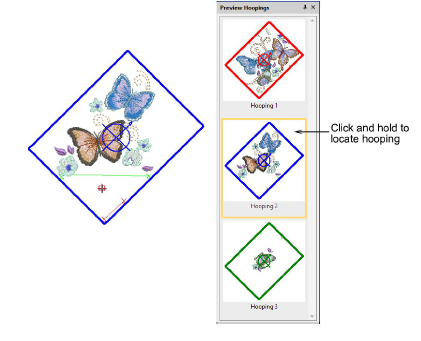
6Use la herramienta Vista previa de encuadres para previsualizar las posiciones de aro en el panel acoplable. Haga clic y mantenga para aislar el encuadre en la ventana de diseño.
7Guarde el diseño en uno o más archivos o para enviarlo a la máquina.
3EmbroideryStudio siempre intenta incluir objetos completos dentro de los encuadres secuenciales. Donde esto no es posible, dividirá los objetos entre los encuadres. Aunque las líneas de división son visibles solamente en Modalidad de encuadre, se mantienen al cambiar a otras modalidades. Ellas no afectan la integridad del objeto.
3Si se repite la misma posición de aro en la secuencia de bordado, la etiqueta del encuadre lo indicará. Mover un aro ligeramente para incluir los objetos mostrados puede reducir los encuadres repetidos.
3Es importante minimizar los cambios de colores en un diseño. Si activa la configuración de optimización de color en la pestaña Opciones > Encuadres múltiples, la optimización de color se aplica automáticamente a un diseño completo al generar encuadres automáticos.

3Imprima una copia del diseño que muestre las posiciones de aro para ayudarse a bordarlo en el orden correcto de encuadres.
3Secuenciar los objetos de bordado
3Dividir objetos entre encuadres
3Imprimir diseños con encuadres múltiples
Productos
Complementos de EmbroideryStudio
Soluciones
Aprendiendo
|
Copyright ©2025 Wilcom Pty Ltd | Condiciones de uso | Política de privacidad |


