Antes de bordar, algunas máquinas de bordado le exigen posicionar el aro en relación con la aguja en forma precisa. Algunas máquinas requieren que la costura comience en el centro del aro, otras en la periferia. Algunas máquinas requieren que la aguja finalice en el centro, otras en la última puntada. La prestación Inicio y fin automáticos determina la primera y la última posición de aguja en el diseño. Esto hace más fácil colocar la aguja antes de bordar y reduce la posibilidad de que la aguja golpee el lado del bastidor.
Nota: Las máquinas con diseños de centrado automático alrededor de los alcances del diseño ignorarán la configuración Inicio y fin automático.
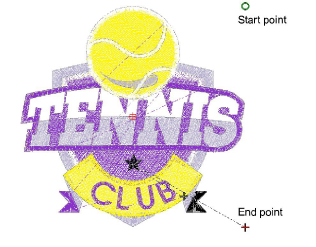
1Haga clic en el botón Inicio y fin automáticos.Un círculo verde indica el punto de inicio mientras que un signo más (+) indica el punto de fin.

Idea: Los símbolos de inicio y fin automáticos pueden activarse mediante la pestaña Opciones > Mostrar diseño. Vea Visualizar puntos de inicio y fin automáticos para más información.
2Haga clic con el botón derecho en Inicio y fin automáticos. Se abre el diálogo.

3Seleccione un método de Posición de inicio:
|
Método |
Notas |
|
Posición inicial |
Desactivar este botón configura la primera puntada del diseño como punto de inicio. |
|
Posición de aguja inicial en el aro |
El centro del aro se configura como punto de inicio.
|
|
Inicio automático en |
El punto especificado en el diseño se configura como punto de inicio. Elija entre las opciones disponibles – arriba-izquierda, centro, abajo-derecha, etc. |
|
Manual |
El punto de inicio se configura por defecto en la última posición seleccionada. |
|
Digitalice la posición inicial |
Se le solicita marcar el punto de inicio. |
4Seleccionar un método de Posicionar fin. Se aplican opciones similares:
|
Método |
Notas |
|
Posición final |
Desactivar este botón configura la última puntada del diseño como punto de fin. |
|
Regresar al inicio |
El punto de inicio seleccionado se configura como punto de fin. |
|
Fin automático en |
El punto especificado en el diseño se configura como punto de fin. |
|
Manual |
El punto de fin se configura por defecto en la última posición seleccionada. |
|
Digitalizar la posición de fin |
Se le solicita marcar el punto de fin. |
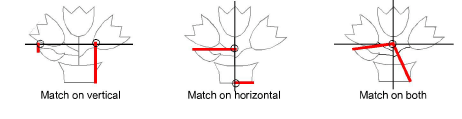
5En el panel Hacer coincidir los conectores, elija si alinear las puntadas de conexión horizontalmente, verticalmente o en ambos planos.
6Seleccione la clase y longitud de las puntadas de conexión en el panel Conectores.
7Haga clic en Aceptar para confirmar. Los conectores – corridos de desplazamiento o saltos – son insertados tal como se especifica, antes de la primera y después de la última puntada del diseño. Pulse en conectores (pulse Mayús+C) para visualizar.
3Si decide digitalizar los puntos de inicio y fin, se le solicita al cerrar el diálogo. Verifique en la Barra de avisos.

3Verifique en su máquina las posiciones de aguja de inicio y fin requeridas. Si no han sido establecidas correctamente en EmbroideryStudio, es posible que su máquina no pueda leer el diseño.
3El formato de archivo PES requiere un punto de inicio arriba-izquierda para bordar correctamente en las máquinas Brother. Esto se maneja automáticamente en EmbroideryStudio, anulando las configuraciones Inicio y fin automáticos.
3 Use el botón Guardar para guardar su preferencia en la plantilla. Esta se convierte en la configuración predeterminada para todos los nuevos diseños en blanco.
3Algunos formatos de archivo invalidarán las configuraciones de inicio y fin establecidas en EmbroideryStudio.
3Los problemas pueden surgir cuando se trata de establecer un punto de comienzo y fin en común para los nombres de equipo.
3Cuando se establecen puntos de inicio y fin manualmente, el aro permanece en una posición fija. Esto le da la libertad de posicionar objetos en cualquier sitio dentro del aro. Es especialmente útil con los aros de posiciones múltiples porque puede ayudar a minimizar la necesidad de repetir encuadres.
3El método Manual también es conveniente si desea evitar que el aro se mueva mientras digitaliza, como ocurre con el Centrado automático.
3El comando Centrar todo puede usarse para centrar el diseño completo y el aro en la posición (0,0). Esto significa que puede reposicionar el aro alrededor del diseño después de haber terminado de digitalizar sin la necesidad de centrar automáticamente.
3Para mantener el diseño en la misma posición de aro en la máquina al guardarlo en EmbroideryStudio, configure la posición de inicio en ‘Posición de inicio de aguja en el aro’ en el diálogo Inicio y fin automáticos, y la Posición de aro en ‘Fijo’ en la pestaña Opciones > Aro.
3Opciones de visualización de diseños
3Visualizar puntos de inicio y fin automáticos
3Configurar posicionamiento de aro automático o fijo
3Producción de nombres de equipo
Productos
Complementos de EmbroideryStudio
Soluciones
Aprendiendo
|
Copyright ©2025 Wilcom Pty Ltd | Condiciones de uso | Política de privacidad |

