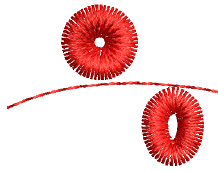
 Con Taladros seleccionado, cada penetración de aguja se convierte en un corte de taladrado, independientemente de la clase de puntada seleccionada. Los agujeros taladrados se estabilizan generalmente con Zigzag para impedir que se deshilachen o se muevan, y se orlan con puntadas Satín.
Ya sea que esté digitalizando para cuchillo o aguja taladradores, la técnica es la misma.
1Asegúrese de que Penetraciones está activado.
2Abra la Lista de puntadas para visualizar lo que está sucediendo a nivel de la puntada.
3Haga clic en el icono Corrido y digitalice un corrido estabilizador alrededor del agujero taladrado. Esto le ayuda a impedir que la tela se rasgue.
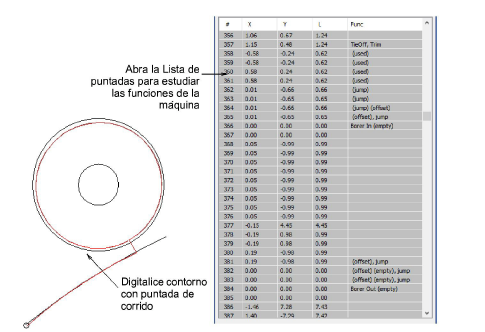
4Haga clic en el icono Taladros. Se inserta una función de máquina para indicar el cambio de bordar a taladrar.
5Usando la herramienta Corrido, digitalice las líneas de corte. Para un agujero redondo, digitalice dos líneas que se crucen. Para un agujero ovalado, digitalice una sola línea de corte. Las formas de diamante representan cortes de taladro en la tela. El tamaño indica la profundidad de corte. No aparecen en TrueView™.
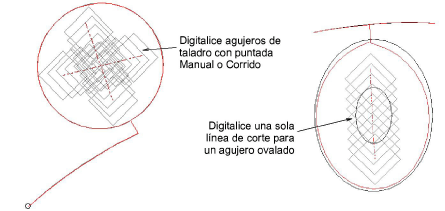
Nota: Algunos digitalizadores prefieren utilizar la herramienta Manual. Cada puntada que digitaliza se convierte en agujero de taladro. Sin embargo, tenga en cuenta que los agujeros digitalizados de esta manera no se pueden redimensionar.
6Desactive la longitud de corrido variable y reduzca a 1.0-1.5 mm mediante Propiedades del objeto > Contornos > Corrido. Esto coloca las penetraciones del taladro más cerca una de otra para un corte más limpio.
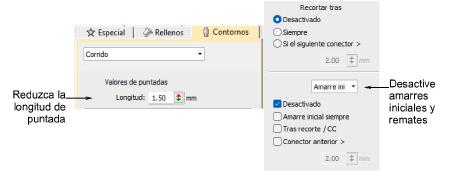
7Dado que el cuchillo taladrador no requiere puntadas de amarre inicial o de amarre final, desactive estas funciones mediante Propiedades del objeto > Conectores.
8Haga clic en Taladros de nuevo para deseleccionarlo. Con ello regresa al bordado normal. Debe ahora estabilizar la tela y crear orlas bordando alrededor de los agujeros con puntadas de cobertura zigzag y satín.
1Con la puntada Zigzag, digitalice alrededor del agujero con Columna A o, si la tiene, con la herramienta Anillo.

2Desactive refuerzo y ajuste la longitud de la puntada a alrededor de 3 mm.
3Coloque el borde interno cerca del centro del agujero para que ‘envuelva’ la tela.
4En la Lista de puntadas verá las funciones Taladro dentro y Taladro fuera cada vez que se activa el cuchillo taladrador.
1Digitalice las puntadas de la cobertura con Columna A y Satín. O, como atajo, duplique el objeto en zigzag y aplique puntada de satín.
2De nuevo, asegúrese de que el refuerzo esté desactivado.
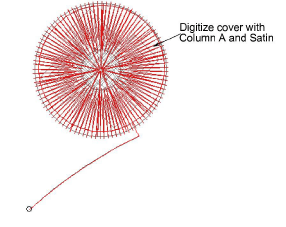
3Utilice Alinear centros para alinear todos los objetos.
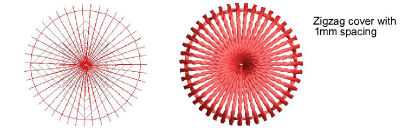
3Para un estilo más abierto, pruebe Zigzag por sí solo disminuyendo el espacio de puntadas a alrededor de 1 mm.
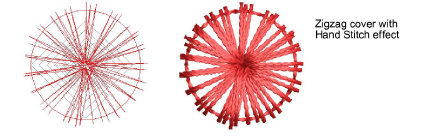
3Para un look más orgánico, intente aplicando el efecto Puntada a mano a las puntadas de cobertura Zigzag.
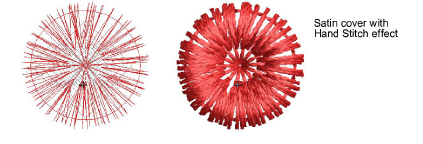
3O para una cobertura más densa, pruebe el efecto Puntada a mano con Satín.
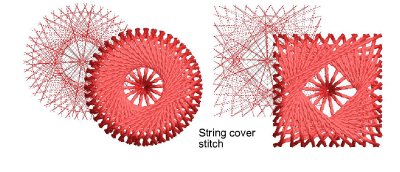
3Pagadhi o puntada de Cuerda también puede proporcionar una cobertura interesante para agujeros taladrados, tanto redondos como cuadrados.
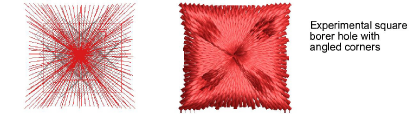
3Aquí vemos un diseño experimental de agujero de taladrado cuadrado. Con esquinas pronunciadas, las puntadas tienden a halar la tela hacia adentro. Tratamos de compensar esto inclinando las esquinas hacia afuera.
3Digitalizar contornos y detalles
3Las configuraciones de amarre inicial automático
3Las configuraciones de amarre final automático
3Configuraciones de longitud de puntada
3Digitalizar columnas uniformes
Productos
Complementos de EmbroideryStudio
Soluciones
Aprendiendo
|
Copyright ©2025 Wilcom Pty Ltd | Condiciones de uso | Política de privacidad |


