|
|
Use Contornos > Digitalizar corrido para colocar una fila de puntadas individuales de corrido a lo largo de una línea digitalizada. |
|
|
|
|
Use Contornos > Digitalizar corrido para colocar una fila de puntadas individuales de corrido a lo largo de una línea digitalizada. |
|
|
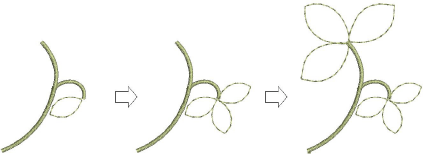
EmbroideryStudio proporciona herramientas para crear puntadas de contorno de grosores y estilos variables. Dichas herramientas colocan una fila de puntadas de corrido a lo largo de una línea digitalizada. Se usan generalmente para añadir contornos y detalles. Pueden usarse también para lograr un efecto decorativo.
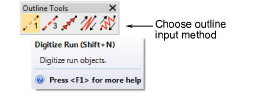
3Seleccione una herramienta de ingreso apropiada junto con un tipo de puntada de contorno.
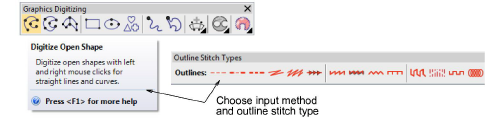
3Alternativamente, escoja un método de ingreso de contorno tradicional en las herramientas de Contornos.
3Además de Corrido y Corrido triple, los métodos tradicionales incluyen:
|
|
Use Corrido de motivo para colocar una fila de motivos a lo largo de una línea digitalizada. |
|
|
Use Pespunte para colocar una fila de puntadas de pespunte a lo largo de una línea digitalizada. |
|
|
Use Punto de tallo para colocar una fila de puntadas de tallo a lo largo de una línea digitalizada. |
3Escoja un color en la barra de Color. Puede cambiar colores en cualquier momento.
3Digitalice la forma marcando puntos de referencia.
3Haga clic en el botón izquierdo para puntos de esquina.
3Haga clic en el botón derecho para puntos de curva.
3Para forzar la línea en incrementos de 15°, mantenga pulsada la tecla Ctrl mientras digitaliza.
3Para obtener un arco circular perfecto, marque tres puntos clicando en el botón derecho.
3Donde se unen las curvas – bien a una línea recta, bien a otra curva – haga clic para marcar el punto de conexión.
Idea: Si se equivocara, pulse la tecla de Retroceso para eliminar el último punto. Pulse Esc para deshacer todos los puntos nuevos. Pulse Esc de nuevo para salir de la modalidad de digitalizar.
3Pulse Intro para acabar.
3Para ver mejor las puntadas, use la barra Visualizar para mostrar/ocultar los fondos.
3Opcionalmente, use los comandos Editar > Cerrar forma... para cerrar el objeto usando puntos rectos o curvos.
3Opcioinalmente, haga doble clic en los objetos para acceder a propiedades del objeto.

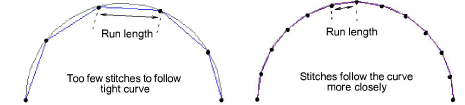
3Para establecer una longitud de puntada fija, ajuste el campo Longitud. Para curvas cerradas, reduzca la longitud – p.ej. 1.8 mm – para que las puntadas sigan la línea más de cerca. Alternativamente, acorte de forma automática las puntadas para poder seguir curvas cerradas, con la opción Longitud variable de corrido.
Idea: Use Desplazamiento automático para desplazarse en la ventana de diseño automáticamente mientras esté digitalizando. Para desactivar temporalmente Desplazamiento automático, mantenga pulsada la tecla Mayús. Use la combinación de teclas Ctrl+Mayús+A para activar/desactivar rápidamente Desplazamiento automático.
3Visualizar componentes gráficos
Productos
Complementos de EmbroideryStudio
Soluciones
Aprendiendo
|
Copyright ©2025 Wilcom Pty Ltd | Condiciones de uso | Política de privacidad |


