|
|
Use Bling > Editor de paleta bling, para seleccionar y configurar formas de piedras de imitación de una biblioteca de patrones. |
|
|
Use Bling > Editor de paleta bling, para seleccionar y configurar formas de piedras de imitación de una biblioteca de patrones. |
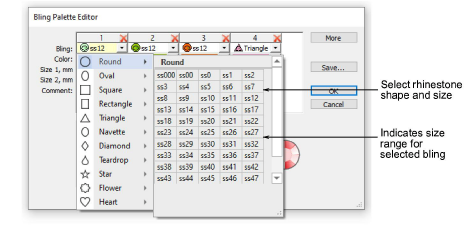
El Editor de paleta bling le permite preparar una paleta de piedras de imitación para usar con en el diseño actual. Una vez configurada, la paleta estará disponible para su uso en Propiedades del objeto o en la barra de herramientas Bling.
1Haga clic en il icono Editor de paleta bling.
Los campos han sido organizados en pestañaspara que los parametros de cada clase de piedra de imitación se puedan visualizar rápidamente.

Nota: Los controles que se encuentran disponibles en la Editor de paleta bling se parecen a aquellos que se encuentran disponibles en el Editor de la paleta de lentejuelas.
2Haga clic en el botón Más nuevos artículos cuando sea necesario.
3Use el menú desplegable Bling para seleccionar la clase y el tamaño de las piedras de imitación – p. ej. ‘Round ss12’.
La list desplegable muestra las piedras de imitación que se encuentran disponibles para usar con corridos y rellenos. El código especifica una gama de tamaños en la parte de abajo del menú – p. ej. ‘ss12’ se encuentra dentro de un rango de tamaño de 3.00-3.20 mm.
4Edite los colores y tamaños del bling como requiera. Los controles se resumen a continuación.
|
Control |
Función |
|
Color |
Cambie los colores haciendo clic en la flecha desplegable y accediendo la paleta de selección de colores. Escoja de una gama de colores estándares y no estándares o mezcle sus propios colores. |
|
Tamaño1 / Tamanño2 |
Estos campos que controlan las dimensiones de bling. Los círculos, los cuadrados, las estrellas, las flores y los triángulos (equilaterales) tienen anchuras editables. Todas las otrad formas tienen alturas y anchuras editables. Las unidades de medida se determinan por el usuario. Vea también Establecer las unidades de medida. |
|
Comentario |
El comentario es un campo de texto libre en el cual se puede inserir un áximo 128 carácteres. |
|
Clase de producción |
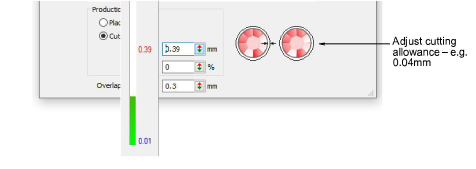
Si está usando una máquina de cortado, puede ajustar el valor de tolerancia del cortado para que las piedras de imitación quepan con facilidad en los agujeros que se han sido perforados en el esténcil. Véase más adelante. |
|
Tolerancia del solapamiento |
Con esto se decide la distancia mínima entre las piedras. Una vez establecida, el software controla la colocación de forma que ninguna piedra de se encuentre más cerca que ese valor. Vea también Editar los objetos de relleno bling. |
|
Guardar |
Guarde la paleta en el sistema de rellenos para usarla durante otra sesión. |
5Definir una Clase de producción para la paleta bling.
3Colocación: Si usted tiene una máquina semiautomática o automática, entoces ecoja esta opción.
3Cortar: Si usted tiene una máquina de cortado, debe perforar el material de la plantilla con agujeros un poco más grandes que las piedras de imitación que desea usar. Puede configurar el valor de la Tolerancia a digamos 0.04mm, para que las piedras de imitación quepan con facilidad en los agujeros del esténcil.
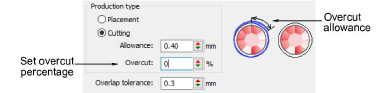
3Configurar la tolerancia del Sobrecortado (como porcentaje) según sea necesario. Esto determina la distancia que la cuchilla tendrá que viajar para asegurar un corte limpio. Es posible que tenga que experimentar con esta configuración dependiendo de la máquina de recorte que esté usando.
Nota: Los objetos bling exportados a una cortadora conservan la información de color y los contornos de corte tienen ancho de raya.
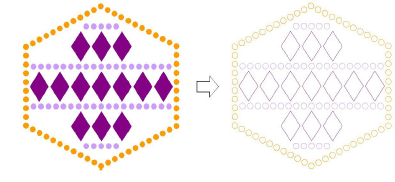
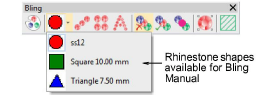
6Haga clic en Aceptar para confirmar. Las formas de piedras de imitación ahora se encuentran disponibles para el uso en Propiedades del objeto o desde la paleta Bling manual.
Idea: Haga clic en Guardar para guardar la paleta de bling en la plantilla actual. Es buena idea establecer una plantilla de bling especializada.
3Configurar la paleta de lentejuelas
3Procesos de producción de bling
Productos
Complementos de EmbroideryStudio
Soluciones
Aprendiendo
|
Copyright ©2025 Wilcom Pty Ltd | Condiciones de uso | Política de privacidad |
