Las letras de una fuente personalizada se crean o modifican como los demás objetos de bordado. Las letras personalizadas se pueden componer de múltiples objetos, y pueden ser letras, números, símbolos o imágenes. Para cambiar la forma de una letra existente, primero debe fragmentarla. La letra revierte a objetos de bordado y se pierden las propiedades de la letra tales como el tipo de fuente y la línea de base. Cuando haya terminado de modificar, tendrá que volver a introducir tales detalles.
1Importe el punto de inicio de su letra personalizada. Puede utilizar varios métodos:
3Importar y ajustar el tamaño de la ilustración artística Las letras tienen una altura generalmente entre 20 y 40 mm.
3Seleccione una fuente TrueType en Modalidad gráficos, ingrese la letra o letras que desea usar y vuelva a cambiar a Modalidad bordado.
3Pre-convierta una fuente TrueType completa usando la función Convertir fuentes de TrueType.
3Seleccione una fuente de bordado existente y escriba la letra o letras que desea utilizar.
2Si utiliza una fuente de bordado existente como punto de partida, primero debe aplicar Fragmentar para revertir la letra a objetos de bordado normales. Se pierden las propiedades de letras como tipo de fuente y línea de base.
3Seleccione un método de entrada.
3Si digitaliza la secuencia y los conectores manualmente, use cualquier método de entrada.
3Si desea que la letra sea resecuenciada automáticamente con Unión más cercana o Unión inferior, use Columna A, Columna B, Columna C y objetos de relleno complejo.
4Seleccione tipo de puntada La mayoría de las letras emplean satín o tatami.
5Digitalice cada sección de la letra.
3Cree un ‘solape’ para unir dos pinceladas. Los sublapes deben ser cerca de un tercio del ancho del trazo o menos, aunque pueden ser la mitad en el caso de trazos finos.
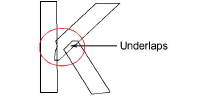
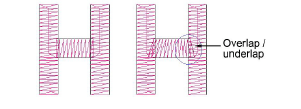
3Evite tener más de dos trazos uno encima del otro, puesto que ello causa acumulación de hilo y puede conducir a su rotura. A veces, con modificar la forma se puede mejorar la situación.
3En ocasiones puede ser útil angular los extremos de los sublapes de tal modo que unas cuantas puntadas queden ‘cogidas’ por el trazo traslapado.
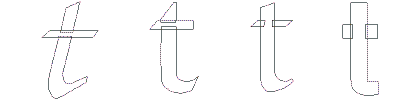
3Allí donde un trazo se cruza con otro, como en el caso de la letra t, habitualmente uno de los trazos se rompe en dos partes. En el caso de objetos finos, usted puede digitalizar el trazo superior como un único fragmento, cruzándolo por encima o por debajo del otro.
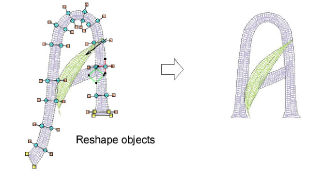
6Ajuste los contornos existentes usando la herramienta Reformar objeto en caso necesario.
7Cuando la letra tenga la forma correcta, guárdela como letra personalizada.
3Insertar imágenes de mapa de bits
3Desintegrar los objetos compuestos
3Guardar letras personalizadas
Productos
Complementos de EmbroideryStudio
Soluciones
Aprendiendo
|
Copyright ©2025 Wilcom Pty Ltd | Condiciones de uso | Política de privacidad |

