Aunque puede aplicar Efecto florentino a cualquier forma cerrada, generalmente se usa en conjunto con los métodos de entrada Relleno complejo o Cerrar forma. Esto se debe a que Efecto florentino anula cualquier ángulo de puntada que se esté aplicando. Puede aplicar el efecto al digitalizar o a objetos existentes.
1Escoja método de ingreso y tipo de puntada adecuado. Efecto florentino funciona bien con satín, tatami o incluso divisiones de programas.
2Haga clic en el icono Efecto florentino.
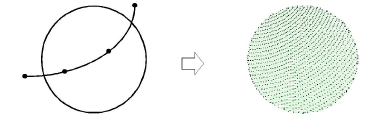
3Digitalice los bordes y los puntos de entrada y de salida del objeto siguiendo las indicaciones.
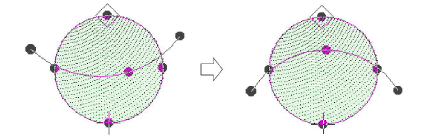
4Digitalice la línea guía que quiere que sigan las puntadas y pulse Intro. La línea guía debe cruzar ambos lados del objeto, tener al menos tres puntos, y no debe traslaparse a sí misma. Las curvas dan por lo general mejores resultados que las esquinas pronunciadas.
5Use Reformar objeto para modificar la línea guía.
3Para obtener resultados óptimos, emplee longitudes de puntada más pequeñas – p.ej. 4,00 mm o menos.
3Con la puntada de satín, desactive divisiones automáticas.
3Los efectos de relleno curvo funcionan mejor con puntadas abiertas.
3También pueden funcionar bien con Espaciado acordeón.
Productos
Complementos de EmbroideryStudio
Soluciones
Aprendiendo
|
Copyright ©2025 Wilcom Pty Ltd | Condiciones de uso | Política de privacidad |


