Aplicar Efecto florentino a los objetos de relleno complejo existentes. El efecto puede también aplicarse a objetos Columna A o B. También puede aplicar Efecto líquido a objetos existentes.
1Seleccione un objeto y seleccione un método de relleno curvo.
2Con el objeto todavía seleccionado, haga clic en el icono Reformar objeto. Aparece una línea guía por defecto con tres puntos de control de esquina.
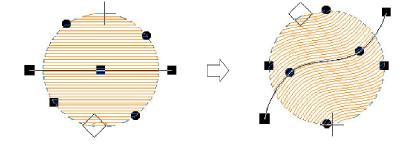
3Reforme las líneas guía de la manera normal moviendo, añadiendo, cambiando o eliminando puntos de referencia.
4Pulse Intro. EmbroideryStudio regenera las puntadas a lo largo de la nueva curva.
5Active TrueView™ o haga clic en el icono Mostrar penetraciones de aguja para ver los resultados.
Productos
Complementos de EmbroideryStudio
Soluciones
Aprendiendo
|
Copyright ©2025 Wilcom Pty Ltd | Condiciones de uso | Política de privacidad |


