A veces puede desear bordar en ubicaciones específicas de prendas, gorras y otros artículos. Por ejemplo, puede desear bordar un diseño de monograma en el bolsillo de una camisa. Utilice esta técnica con máquinas que le permitan mantener conectores de inicio y fin.
1Abra un diseño.
2Haga clic en el botón de alternancia Centrar todos para configurar automáticamente la posición de aro en ‘Fijo’. Esto le permite colocar el diseño en la ubicación deseadas.
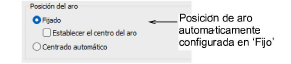
Idea: El botón de alternancia Centrar todo activará también automáticamente la ‘Posición de inicio’ en el diálogo Inicio y fin automáticos y la configurará en ‘Posición de aguja inicial en el aro’.
3Usando la caja de herramientas Letras , crear letras o diseño de monograma.
4Opcionalmente, incluya un fondo para la prenda que está usando.
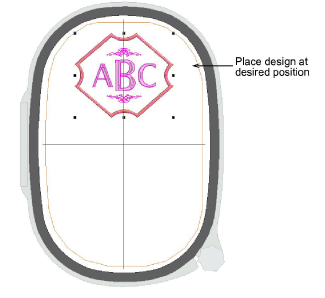
5Opcionalmente imprima la hoja de trabajo de diseño. La hoja de trabajo muestra el marcador de posición del aro.
6Envíe el diseño a la máquina. El diseño se posiciona en la misma ubicación que se muestra en pantalla. Usa la posición de aguja inicial para ubicar el diseño en relación con el centro del aro.
7Sujete el aro a la prenda usando la línea central vertical de la plantilla del aro para ubicar el centro del bolsilloLuego coloque la respectiva línea central horizontal de la plantilla del aro 10mm debajo del borde superior del bolsillo.
8Asegúrese de que su máquina esté configurada para mantener la posición de inicio de diseño guardada.
9Borde el diseño.
3Configurar puntos de inicio y fin
Productos
Complementos de EmbroideryStudio
Soluciones
Aprendiendo
|
Copyright ©2025 Wilcom Pty Ltd | Condiciones de uso | Política de privacidad |

