Cuando saca un diseño de nombres de equipo, tiene que definir cómo se va a generar como archivo de máquina. Puede generar archivos que incluyan:
3Tanto diseños como nombres en un sólo archivo
3el diseño en un archivo y los nombres en otro, o
3Archivos individuales para cada nombre con su diseño.
Establece estas opciones cada vez que guarda el archivo en formato máquina o lo envía directamente a la máquina.
Accede al diálogo Opciones de exportación > Nombres de equipo en cualquiera de esta maneras:
3Seleccione Archivo > Exportar archivo de máquina, elija un formato de archivo de máquina – p. ej. DST – de la lista desplegable Guardar como tipo y haga clic en Opciones.
3Seleccione Archivo > Grabar en base de datos, elija un formato de archivo de máquina – p. ej. DST – de la lista desplegable Guardar como tipo y haga clic en Opciones.
3Seleccione Características heredadas > Disquete > Guardar como > Opciones.
3Seleccione Características heredadas > Enviar al Administrador de Máquina > Opciones.
3Seleccione Características heredadas > Enviar al Administrador de Puntada > Opciones.
3Seleccione Archivo > Enviar al Administrador de Conexión > Opciones.
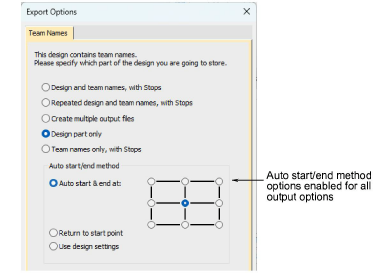
Las siguientes opciones de salida están disponibles para usted:
|
Opción |
Función |
|
Diseño y nombres de equipo, con paradas |
Crea un archivo individual de máquina incluyendo una copia del diseño y todos los nombres. Las paradas se insertan tras el diseño, y entre los nombres – es decir Diseño Parada TeamMember1 Parada TeamMember2 Parada, etc. |
|
Diseño repetido y nombres de equipo con paradas |
Crea un archivo individual de máquina con copias múltiples del diseño y todos los nombres. Las paradas se insertan tras cada combinación estática diseño/nombre – por ejemplo, Diseño + TeamMember1 Parada Diseño + TeamMember2 Parada. |
|
Crear múltiples archivos de salida |
Crea archivos separados para cada nombre, cada uno de los cuales incluye una copia de la parte estática del diseño. Al bordar en el Administrador de máquina ES, cada archivo se pone en la cola por separado. |
|
Solo parte del diseño |
Crea un archivo que contiene únicamente la parte estática del diseño. |
|
Nombres de equipo solamente con paradas |
Crea un único archivo que contiene sólo los nombres, separados por paradas. Ello significa que tras cada parada de máquina, puede cambiar los bastidores. |
El método de Inicio y fin automáticos se encuentra disponible para conectar la primera y última puntada de un diseño. Ello hace más fácil colocar la aguja antes de bordar y reduce la posibilidad de que la aguja golpee el lado del bastidor. Si elije ‘Diseñar solo parte’ o ‘Solo nombres de equipo’, estas configuraciones se relacionan solo con esos ítemes.
|
Método |
Descripción |
|
Inicio y fin automáticos a las |
Si no ha configurado puntos de inicio y fin explícitos antes de exportar, se selecciona por defecto Inicio y fin automáticos, predeterminando Centro-Centro. |
|
Regresar al punto de comienzo |
Crea una puntada de conexión desde el punto final al punto de comienzo. |
|
Use configuraciones de diseño |
Si ha configurado puntos de inicio y fin explicítos antes de exportar, esta opción se selecciona por defecto. |
Los problemas pueden surgir cuando se trata de establecer un punto de comienzo y fin en común para los nombres de equipo.
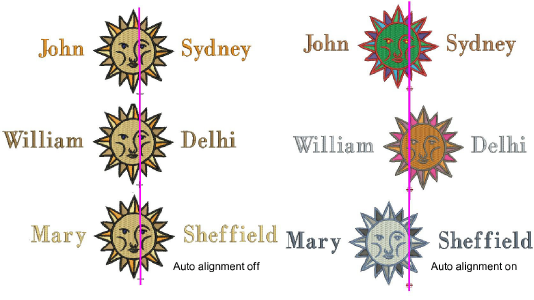
Los diseños de nombre de equipo, sin embargo, se pueden hacer bordar en una ubicación consistente en la prenda independientemente de la longitud del nombre. Seleccione una de las dos opciones de salida:
3‘Diseño repetido y nombres de equipo, con paradas’, o
3‘Nombres de equipo solamente, con paradas’
Y seleccione uno de los nueve puntos finales de Inicio y fin automáticos predefinidos.
Nota: El propósito de la alineación automática es permitir que las disposiciones de ‘nombre del marco’ y los diseños repetidos opcionales se puedan cocer en la misma ubicación sobre cada prenda cuando los nombres tienen longitudes distintas.
3Configurar puntos de inicio y fin
3Enviar diseños a Administrador de Puntada
Productos
Complementos de EmbroideryStudio
Soluciones
Aprendiendo
|
Copyright ©2025 Wilcom Pty Ltd | Condiciones de uso | Política de privacidad |