|
|
Use Reformar > Reformar objeto para cambiar el espaciado de letras. |
El espaciado entre letras se calcula automáticamente como un porcentaje de la altura de las letras. En la mayoría de los casos, el espaciado por defecto será adecuado. A veces puede desear controlar la extensión total de las letras para que encajen en una ubicación específica. De igual manera, cambie el espacio entre líneas en un objeto de letras de múltiples líneas usando la herramienta Reformar objeto. Algunas veces el espaciado entre letras puede parecer demasiado grande o demasiado pequeño, dependiendo de la forma de las letras vecinos. Para compensar este efecto visual, puede mover una o varias letras seleccionadas más cerca o más lejos una de la otra a lo largo de la línea de base con el fin de mejorar el espaciado.
1Seleccione el objeto de letras y haga clic en el icono Reformar objeto

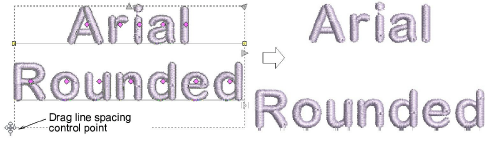
2Arrastre el punto de control de espaciado de letras a la izquierda o la derecha para ajustar el espaciado de todas las letras a lo largo de la línea de base.

3Suelte el botón del ratón para concluir y pulse Esc.
Idea: Cuando la configuración de justificación es Total, las letras se distribuyen uniformemente a lo largo de la línea de base. Para cambiar el espaciado para tener letras con justificación total, simplemente cambie la longitud de la línea de base.
4Arrastre el punto de control de espaciado de línea hacia arriba o abajo para cambiar el espaciado de líneas.
5Suelte el botón del ratón para concluir y pulse Esc.
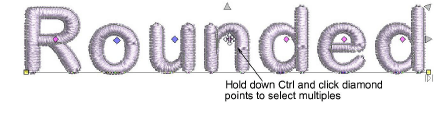
6Haga clic en el punto de control en forma de rombo en el centro de la letra. Para seleccionar letras múltiples o una gama de letras, mantenga pulsada Ctrl o Mayús mientras selecciona.
7Arrastre la letra o letras seleccionadas a lo largo de la línea de base o use teclas de flecha para ajustar el espaciado.

Idea: Alternativamente, para mover múltiples letras, haga clic en el botón derecho en el punto de control en forma de rombo de la primera letra y arrastre. Todas las letras hasta el final de la línea se mueven como una sola.
8Suelte el botón del ratón para concluir y pulse Esc.
3Configurar el kerning automático de letras
3Configurar el espacio automático entre letras
Productos
Complementos de EmbroideryStudio
Soluciones
Aprendiendo
|
Copyright ©2025 Wilcom Pty Ltd | Condiciones de uso | Política de privacidad |
