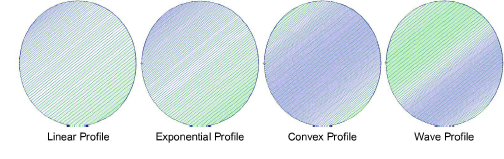
Desde atardeceres hasta granos de madera, Mezcla de colores crea mezclas de colores interesantes. Úselo con tatami estándar para crear profundidad y sombreado. Se funden dos colores suavemente desde uno al otro empleando una mezcla de un relleno denso y uno abierto.

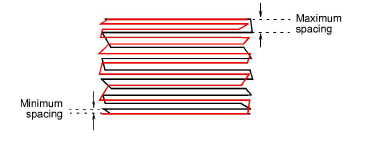
El efecto se aplica generalmente a objetos Relleno complejo. Se pueden crear mezclas curvas con objetos Columna A, B o C. Los objetos pueden ajustarse de tamaño, girarse y sesgarse sin perder el efecto de mezcla de colores. Las posibilidades de editar un objeto de colores mezclados son limitadas. Los dos componentes deben primero desagruparse y los objetos separados editarse según las configuraciones de Espaciado acordeón, como color, perfil y espaciado.
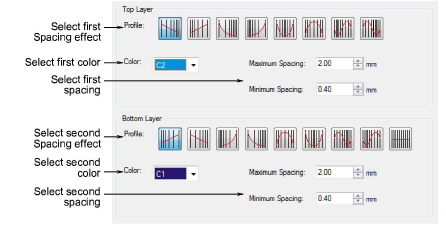
1Seleccione un objeto tatami y haga clic en el icono Mezcla de colores. Se abrirá el diálogo Mezcla de colores.
Idea: A causa de la puntada abierta, es mejor usar Espaciado acordeón sin Refuerzo automático.
2Seleccione perfiles complementarios para las capas superior e inferior. En general, deseará usar opuestos pero también puede mezclar y casar perfiles completamente distintos.
3Escoja colores complementarios para cada capa y ajuste las configuraciones de espaciado. Por lo general, usará los mismos valores de espaciado de forma que los colores se mezclen uniformemente.
4Haga clic en OK para generarlo.
Nota: Para evitar que las puntadas de refuerzo se vean a través, se anula por defecto la selección de Refuerzo automático y se aplica Trapunto.
1Seleccione el objeto con mezcla y pulse Ctrl+U para desagrupar.
2Seleccione un componente y cambie el color como necesite.
3Haga doble clic en el objeto para abrir las Propiedades del objeto.
4Haga clic en el botón FX y seleccione la pestaña Acordeón.
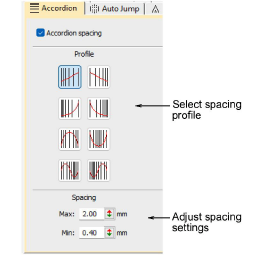
5Seleccione un perfil y ajuste las configuraciones de espaciado tal como lo requiera.
6Repita el proceso para el segundo objeto y reagrupe los objetos.
Productos
Complementos de EmbroideryStudio
Soluciones
Aprendiendo
|
Copyright ©2025 Wilcom Pty Ltd | Condiciones de uso | Política de privacidad |

