Las ilustraciones pueden insertarse, pegarse o escanearse en EmbroideryStudio para usarlas como telones de fondo de la digitalización. Las herramientas de auto digitalización manejan los formatos de mapa de bits y vectorial. Para la digitalización tanto automática como manual, las imágenes ‘limpias’, a veces llamadas ‘comics’, funcionan mejor. Según sea la calidad de la imagen escaneada, tal vez tenga que retocarla manualmente antes de procesarla en EmbroideryStudio. Normalmente lo hará para eliminar planos de fondo, rellenar áreas sólidas con color, añadir o reforzar contornos o cerrar huecos.
1Escanee o importe la imagen a usar. Si emplea gráficos de mapas de bits o vectoriales, es necesario prepararlos primero:
3Escanee o inserte una imagen de mapa de bits. Si está empleando una imagen de mapa de bits como entrada, deberá procesarla antes de la conversión.
3Inserte o cree un gráfico vectorial. Si está usando un gráfico vectorial como entrada, puede eliminar los objetos traslapados ‘fusionándolos’. Esto elimina costuras traslapadas cuando se convierten los objetos vectoriales.
2Si emplea gráficos de mapas de bits o vectoriales como entrada, es necesario prepararlos primero:
3Si está usando una imagen de mapa de bits, puede ser procesada antes de la conversión.
3Si está usando un gráfico vectorial, puede eliminar los objetos traslapados ‘fusionándolos’. Esto elimina costuras traslapadas cuando se convierten los objetos vectoriales.
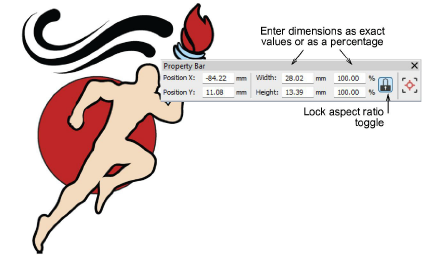
3Dimensione la imagen al tamaño preferido para el artículo escogido.
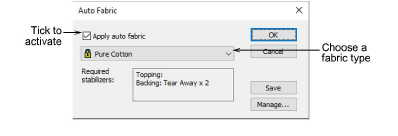
4Opcionalmente, seleccione Diseño > Tela automática para aplicar configuraciones de la tela de la manera deseada.
5Recorte la imagen como desee utilizando las herramientas Recortar mapa de bits.
6Opcionalmente, haga clic en Método para casar colores y decida cómo desea manejar el case de colores.
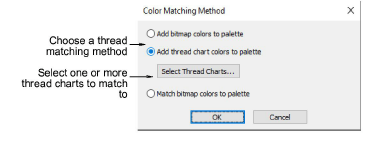
Tiene tres opciones:
3Añadir los colores del mapa de bits directamente a la paleta del diseño (predeterminado).
3Elegir una carta y casar los colores del mapa de bits con los hilos reales. Haga clic en el botón Seleccionar cartas de hilos para acceder a la lista de cartas de hilo.
3O case los colores de imagen con los colores más parecidos en la paleta del diseño.
Idea: Hay varias técnicas disponibles para cambiar los colores del diseño en la barra de herramientas Colores de diseño.
3Cargar ilustraciones de mapa de bits
3Cargar ilustraciones vectoriales
3Preparar ilustraciones para la digitalización
3Añadir y casar los colores de imagen
Productos
Complementos de EmbroideryStudio
Soluciones
Aprendiendo
|
Copyright ©2025 Wilcom Pty Ltd | Condiciones de uso | Política de privacidad |

