|
|
When you open Schiffli machine files, you can set decoding options to determine how to read the design. A set of Standard decoding options are the same for all formats. The Conversion Details decoding options are specific to the file type being opened – Plauen or Saurer. See also Schiffli encoding & decoding settings (Supplement).
Note: Opening RCC type designs in EmbroideryStudio is not covered here. See Opening RCC and INC files for details.
1Open the file from your hard disk, or read it from tape or embroidery disk.
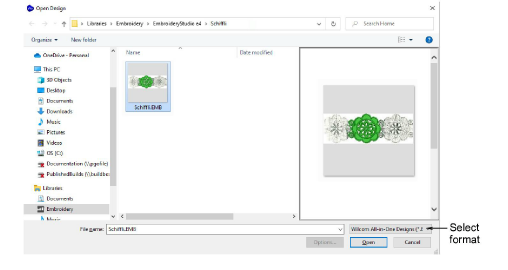
2Select a Schiffli file format from the Files of Type list and select the file to open.
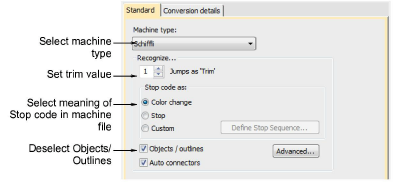
3Click Options. The Open Options dialog opens at the Standard tab.
Caution: Decoding options should reflect how the design was originally digitized, not how you want it now. Experiment with the settings to get the best results.
4Select Schiffli as the machine format from the Machine Type list if not already selected.
5Enter the number of jumps to recognize as trims. The specified number of consecutive jumps will be converted to a trim function.
Caution: If this value is different from the original design, trim functions will be not be inserted correctly.
6Use the Stop Code panel to define the meaning of stop codes in the original machine file.
|
Function |
Purpose |
|
Color Change |
Stop codes are interpreted as Next Color commands. The next color is selected from the default color palette. |
|
Stops |
Stop codes are interpreted as Explicit Stops. The machine stops stitching. |
|
Custom |
Lets you map thread colors to every Stop code in the file. This means you can color code machine files which do not contain needle addressing information before opening the file. See Reassigning colors to machine files for details. |
7Select or deselect the Objects/Outlines checkbox as required.
Open without object/outline recognition for ‘stitch editing’ or ‘block editing’ of manual stitch objects. This is the default.
Open with object/outline recognition for re-shaping, or stitch density or pull compensation adjustments of supported stitch types, particularly Satin and Run stitch. With this option, designs are more likely to be emblem than lace. If you select this option, the Advanced button becomes available. See Advanced recognition settings for details.
Tip: For lace designs, Tatami recognition should be turned off in the advanced options. If only a few objects need to be reshaped, it may be better to recognize only selected stitches inside EmbroideryStudio after opening.
8Select or deselect the Auto Connectors checkbox as required.
Deselect to open designs with connectors recognized as Manual objects. This avoids stitch editing problems caused by automatic connectors. This is recommended for lace designs.
Select to open appropriate designs with automatic connectors without having to use object/outline recognition. This option is more applicable to emblem style designs than lace.
9Select the Conversion Details tab for further machine-specific options.
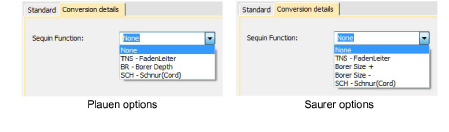
10Select the Sequin Function you require.
If the sequin function is set to something other than None, all instances of the selected physical function are converted to the ES Schiffli Drop Sequin function. See also Other machine functions.
Tip: In order to select the correct physical function, you have to know what function was used in the original design file to drive the sequin mechanism on the target machine. If you don’t know, experiment with different settings until you get the right one.
11Click OK.
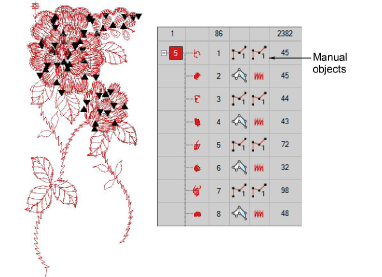
12Click Open. If you use the default settings, the design opens as a collection of Manual objects with only general and connector properties.
Note: ES Schiffli adds the missing information to the file but does not change the stitches. See also Adjusting stitch density in the EmbroideryStudio Reference Manual.
|
Copyright ©2024 Wilcom Pty Ltd | Terms of Use | Privacy Policy |
