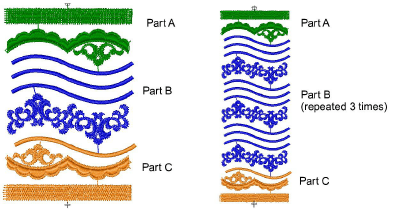
Pattern arrangements can be applied to new EMB designs or added to existing designs. Pattern arrangements in EmbroideryStudio split the design into color blocks which are then arranged into logical parts, Part A is usually one color block, Part B a second color block, and Part C a third color block. Normally, for both lacework and emblems, Color 1 is Part A, Color 2 is Part B, and so on, for each part of the design. However, it is possible to group several color blocks into one part if this is required for RCC designs.
For lacework, the number of rows is normally one for A and C, with multiple rows for B. For emblems, the number of rows is usually the same for each part.
Caution: Only set up the pattern arrangement after the design elements have been finalized. Otherwise the pattern arrangement can become ‘out-of-sync’ with its design.
If the arrangement is out-of-sync, ES Schiffli reverts to a default arrangement. This means that each color block is defined as a separate part with each repetition separated by a Pause function. The default arrangement displays the whole design in one color and has minimal effect on the design data.
1Digitize all parts of the new design as a single EMB file, applying a different color to each part.
2Select Special > Schiffli Arrangement. The Schiffli Arrangement dialog opens showing colors as they occur in the design.

3In the Parts panel, assign a color to each part.
Color: new thread number as required.
Part: new part numbers as required.
For RCC designs, you can allocate more than one color to a part.
Tip: A color block can only be in one part of the arrangement. To re-use it later, duplicate it as a separate color block.
4In the Arrangement Parameters panel, # Rows column, select the number of times you want to stitch this part of the design.
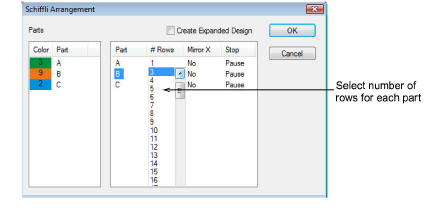
5In the Arrangement Parameters panel, Mirror X column, select how you want to mirror this part of the design.
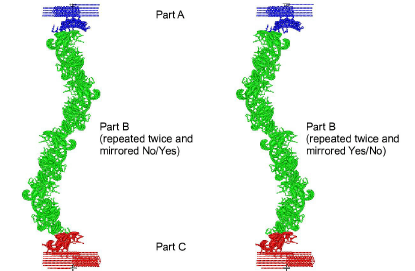
Note: Each arrangement part, or row within a part, is attached to the end point of the previous one. If a part’s end point does not finish directly below its start point, the repeat patterns will shift over multiple rows (unless you mirror them alternately). See also Align parts in machine files.
6In the Arrangement Parameters panel, Stop column, select the required machine function for the last row of each part. For example:
|
Function |
Purpose |
|
Stop |
The machine will stop when it finishes the last row. |
|
Pause |
The machine will stop conditionally when it finishes the last row. This means that the machine will stop only if the machine operator has enabled Stop on Pause. |
|
No |
The machine will automatically continue stitching between rows. |
7Select the Create Expanded Design checkbox if you are going to save the design as a machine format that does not read pattern arrangement files – e.g. DAT. See also View pattern arrangements in expanded design.
8Save the design. See Save pattern arrangements for details.
Tip: You can also manually select the parts and save them as separate files.
|
Copyright ©2024 Wilcom Pty Ltd | Terms of Use | Privacy Policy |