 Use Appliqué to produce the stitching you require for appliqué objects. Up to four layers of stitching – guide runs, cutting lines, tack stitches and cover stitches – can be generated. When you stitch out an appliqué object, the machine stops between layers. Appliqué also allows you to set a frame-out position which shifts the hoop from under the needle, making it easier to place and trim appliqué patches.
1Click the Appliqué icon and digitize the boundary of the shape. Follow the prompts. If you make a mistake, press Backspace to delete the last reference point.
Tip: If you only need to create a single-boundary appliqué object, you may prefer to use the Appliqué without Holes tool.
2Press Enter to close the shape. You can create another appliqué object at this stage.
3Press Enter again.
4Click the outline to set entry and exit points or press Enter to accept defaults.
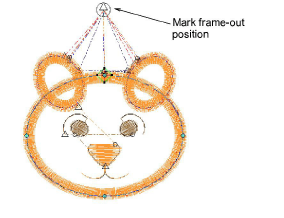
5If prompted to do so, mark the frame-out position or press Enter to accept the default.
Frame-out commands are specified as a Stop function or Color Change respectively. They can be set after guide run and/or tack stitch.
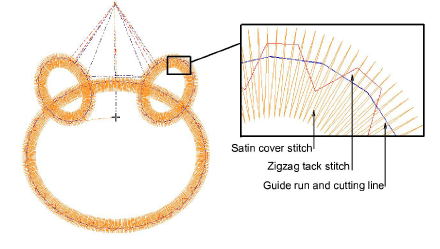
6Press Enter. Up to four layers of stitching – guide run, cutting line, tack and cover – are generated, depending on current settings.
7Double-click the appliqué object to check the settings.
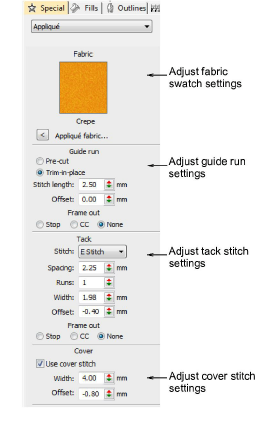
8Adjust settings as required:
Fabric swatch: See Add fabric swatches to appliqué for details.
Guide run: See Adjust guide run settings for details.
Tack stitch: See Adjust tack stitch settings for details.
Cover stitch: See Adjust cover stitch settings for details.
9Optionally, apply Smart Corners to appliqué objects.
10Optionally, run Stitch Player or use the travel tools to check the appliqué stitching sequence.
|
Copyright ©2024 Wilcom Pty Ltd | Terms of Use | Privacy Policy |

