Because chain stitching forms flowing, curved lines, it is mainly used for outlines and more delicate work. It can, however, be used to create flatter fills. Because chenille yarn is thicker than normal thread, it is critical to avoid yarn pile-up caused by overlapping stitches, particularly chain stitches. For this reason, we recommend using open stitch patterns such as Maze Fill, Offset Fill, or Spiral Fill to create the kind of effect you see in this sample.
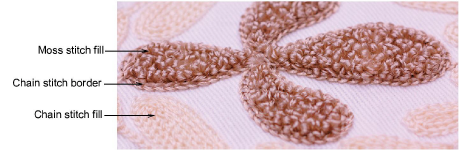
Tip: With Chain stitch blocks, there is no need for borders as such. Chain itself provides a good border.
1Open a new design using the Chenille template and select a machine format to suit.
2Choose an input method – graphical or traditional.
Since stitch angle has no relevance to chain stitching, Complex Fill is fine for most shapes. Some graphic tools may be used – Closed Shape, Rectangle, Ellipse, and Basic Shapes.
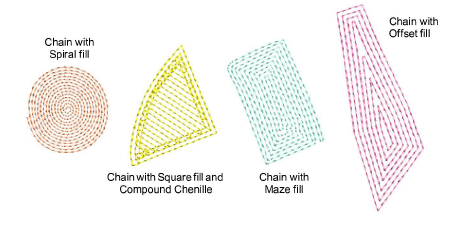
3Select Chain stitch and choose a suitable fill pattern:
|
Fill pattern |
Uses |
|
|
|
Create maze-like stitching which follows object contours for open fills. |
|
|
|
Create offset fill stitching in any closed shape. |
|
|
|
Create spiral stitching from the center of any closed object. |
|
4Right-click for settings and adjust spacing and length as necessary. Stitch length determines the size of chain. The greater the value, the larger the pattern. Spacing needs to accommodate yarn thickness.
5Digitize the boundary like any embroidery object:
Left-click for corner points
Right-click for curve points.
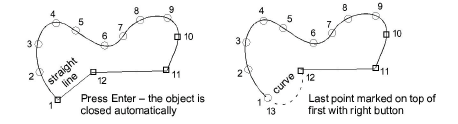
Tip: Use the prompts in the Prompt Bar to help you digitize. If you make a mistake, press Backspace to delete the last reference point. Press Esc to undo all new reference points.
6Press Enter to complete. The chain-fill object is generated according to current settings.
7With the object selected, open Object Properties to adjust fill settings, including spacing.
|
Copyright ©2024 Wilcom Pty Ltd | Terms of Use | Privacy Policy |


