|
|
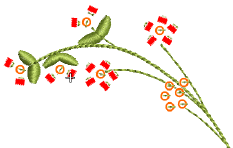 Il metodo d’input Perlina manuale ti munisce di controllo individuale sulla disposizione di perline e punti fissanti. Create decorative bead placements or ‘clusters’ using beads from the palette. Per aggiungere una perlina alla sequenza punti, devi semplicemente cliccare alla destra del mouse sganciandola sul disegno, e fissarla con punti manuali.
Nota: L’applicazione punti perlina aillette manuali è un’abilità di digitalizzazione difficile da apprendere e la sequenza punti deve essere pianificata accuratamente al fine di ridurre al minimo i punti inutili. Sperimenta con la tua macchina la lunghezza punti e le impostazioni spaziatura per ottenere il risultato desiderato.
1Seleziona un formato macchina che supporti la modalità perlina tramite il dialogo Seleziona formato macchina. Per dettagli vedi Select bead-capable machines.
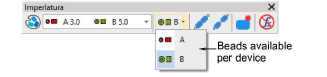
2Set up your palette in the Bead Palette Editor according to the machine type – single, twin, multi-bead – that you have selected.
3Select a color for the fixing stitch from the Color toolbar.
4Clicca l’icona Perlina manuale. If you have activated twin-bead mode, bead options are displayed in the droplist.
Suggerimento: Esegui zoom avanti per una digitalizzazione più esatta. Hold down Ctrl+Shift to constrain the cursor to horizontal and vertical directions, or 15° increments.
5Select a bead and left-click to begin your manual bead placement. Deve iniziare con almeno un punto. How you proceed depends on the layout style you are aiming for. The most common is ‘flat’:

6One technique for creating a ‘flat’ fixing stitch is as follows:
Click-stitch forward as manual run stitching.
Move forward one bead length and right-click to drop a bead. An outline appears.
Click-stitch backwards. This stitch is going through the hole and will pull the bead back and down.
Click-stitch forward across the bead to the drop point.

Click-stitch forward as manual run stitching until you reach the next drop point.
Suggerimento: If you make a mistake while digitizing, press Backspace to retrace your steps.
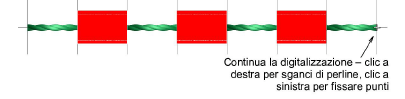
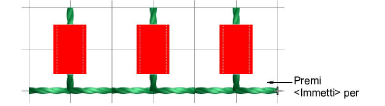
7Continua a digitalizzare manualmente allo stesso modo – clic a destra per aggiungere una perlina, clic a sinistra per digitalizzare punti fissanti. Premi Immetti per finire.
Suggerimento: Remember to test your beading drops on the machine at normal speed (low-to-medium) and then at high speed. Differences will show up at high speed.
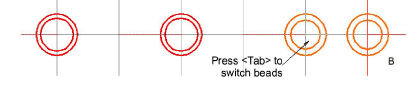
8If you have activated multi-bead mode, press the Tab key to switch between available bead shapes while digitizing.
9Premi Immetti per finire.

Suggerimento: Typically, you combine manual bead drops with Run stitch. Use Run to ‘map out’ the design and use Manual Bead to digitize individual bead drops or ‘bead clusters’.
The recommended technique for creating a ‘sideways’ layout is similar in principle to ‘flat’.
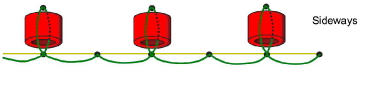
1Click-stitch forward as manual run stitching.
2Turn sideways at the point you want to drop the bead.
3Move forward one bead length and right-click to drop the bead. A bead outline appears.
4Click-stitch backwards. This stitch is going through the hole and will pull the bead back and down.
5Click-stitch forward as manual run stitching until you reach the point of the next bead drop.
6Premi Immetti per finire.
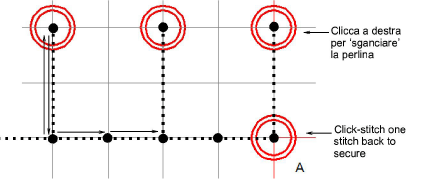
Below is the ‘classic’ upright layout. In this procedure we add some stitch reinforcement to help position the bead.

1Click-stitch forward as manual run stitching.
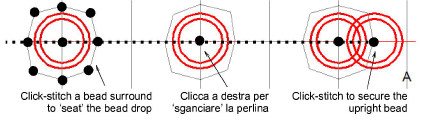
2Optionally, click-stitch a bead surround in manual run stitching. This will help ‘seat’ the upright bead.
3Right-click in the center of the surround to drop the bead. A bead outline appears.
4Click-stitch forwards to the edge of the bead surround. This stitch is going through the hole and will secure the bead in the upright position.
5Click-stitch forward as manual run stitching until you reach the point of the next bead surround.
6Premi Immetti per finire.

Prodotti
Componenti aggiuntivi di EmbroideryStudio
Soluzioni
Apprendimento
|
Copyright ©2023 Wilcom Pty Ltd | Condizioni d'uso | Informativa sulla privacy |
