|
|
 El método de entrada Canutillo manual le permite el control individualizado sobre la colocación de canutillos y puntadas de fijación. Create decorative bead placements or ‘clusters’ using beads from the palette. Para añadir un canutillo a la secuencia de puntadas, simplemente haga clic con el botón derecho para soltarla en el diseño, y asegúrela con puntadas manuales.
Nota: El bordado de canutillo manual es una destreza de digitalización muy difícil y hay que planificar la secuencia de puntadas con cuidado para minimizar las puntadas innecesarias. Experimente con la máquina, la longitud de puntada y las configuraciones de espaciado para lograr los resultados apetecidos.
1Seleccione un formato de máquina que soporte la modalidad de canutillo po medio del diálogo Seleccionar formato de máquina. Vea Select bead-capable machines para más información.
2Set up your palette in the Bead Palette Editor according to the machine type – single, twin, multi-bead – that you have selected.
3Select a color for the fixing stitch from the Color toolbar.
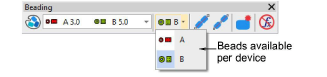
4Clic en el icono Canutillo manual. If you have activated twin-bead mode, bead options are displayed in the droplist.
Idea: Acerque el zoom para digitalizar con más precisión. Hold down Ctrl+Shift to constrain the cursor to horizontal and vertical directions, or 15° increments.
5Select a bead and left-click to begin your manual bead placement. Debe comenzar con al menos una puntada. How you proceed depends on the layout style you are aiming for. The most common is ‘flat’:

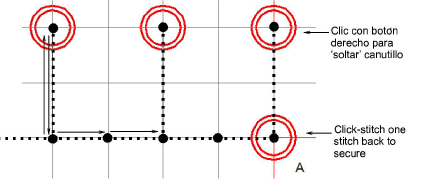
6One technique for creating a ‘flat’ fixing stitch is as follows:
Click-stitch forward as manual run stitching.
Move forward one bead length and right-click to drop a bead. An outline appears.
Click-stitch backwards. This stitch is going through the hole and will pull the bead back and down.
Click-stitch forward across the bead to the drop point.
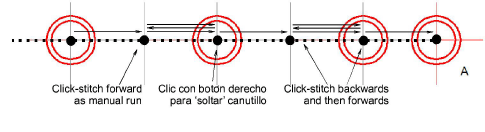
Click-stitch forward as manual run stitching until you reach the next drop point.
Idea: If you make a mistake while digitizing, press Backspace to retrace your steps.
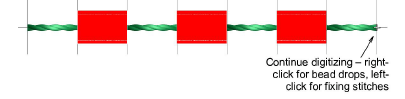
7Continue digitizing manually in the same way – right-click to drop a bead, left-click to digitize fixing stitches. Pulse Intro para acabar.
Idea: Remember to test your beading drops on the machine at normal speed (low-to-medium) and then at high speed. Differences will show up at high speed.
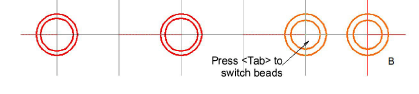
8If you have activated multi-bead mode, press the Tab key to switch between available bead shapes while digitizing.
9Pulse Intro para acabar.

Idea: Typically, you combine manual bead drops with Run stitch. Use Run to ‘map out’ the design and use Manual Bead to digitize individual bead drops or ‘bead clusters’.
The recommended technique for creating a ‘sideways’ layout is similar in principle to ‘flat’.
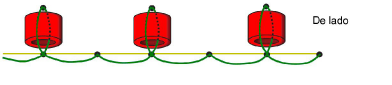
1Click-stitch forward as manual run stitching.
2Turn sideways at the point you want to drop the bead.
3Move forward one bead length and right-click to drop the bead. A bead outline appears.
4Click-stitch backwards. This stitch is going through the hole and will pull the bead back and down.
5Click-stitch forward as manual run stitching until you reach the point of the next bead drop.
6Pulse Intro para acabar.
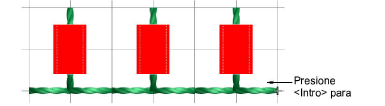
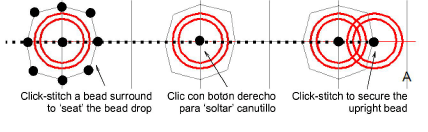
Below is the ‘classic’ upright layout. In this procedure we add some stitch reinforcement to help position the bead.

1Click-stitch forward as manual run stitching.
2Optionally, click-stitch a bead surround in manual run stitching. This will help ‘seat’ the upright bead.
3Right-click in the center of the surround to drop the bead. A bead outline appears.
4Click-stitch forwards to the edge of the bead surround. This stitch is going through the hole and will secure the bead in the upright position.
5Click-stitch forward as manual run stitching until you reach the point of the next bead surround.
6Pulse Intro para acabar.

|
Copyright ©2023 Wilcom Pty Ltd | Condiciones de uso | Política de privacidad |
