Another technique for deploying custom bead fixings is to save them as motifs and use them singly or in motif runs. La función Crear motivo le permite guardar sus propios motivos para usarlos más adelante. Custom motifs are saved in custom ‘motif sets’.
1Create your custom bead and fixing stitch or edit an existing one.

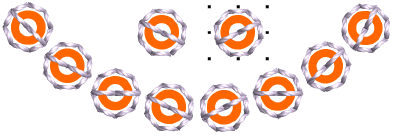
2Duplicate and align the motif as you want it to appear in a motif run. Use Alignment tools for precise arrangement.

3Once you have determined the layout, select objects and apply Closest Join. Use el motivo central para definir los puntos de referencia.
4Select the motif and choose Object > Create Motif.
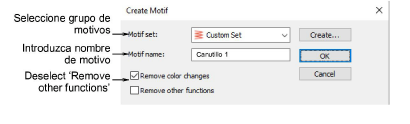
5Seleccione un conjunto de motivos en la lista desplegable e ingrese un nombre en el campo Nombre del motivo.
6Deselect the Remove other functions option. This ensures that beads are preserved.
7Clic en Aceptar.
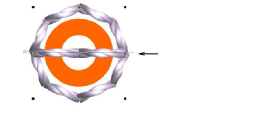
8Click two reference points for the bead motif. These should coincide with entry and exit points.
9Use you custom bead and fixing in bead runs or individual placements.

|
Copyright ©2023 Wilcom Pty Ltd | Condiciones de uso | Política de privacidad |

