
Use Stitch Effects > Pull Compensation to automatically compensate for fabric stretch. Right-click for settings.
|
|
Use Stitch Effects > Pull Compensation to automatically compensate for fabric stretch. Right-click for settings. |
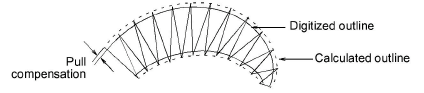
For an object to sew out correctly, it must have correct stitch spacing, sufficient pull compensation together with a suitable underlay for the combination of cover stitch type, object type, object shape and fabric. Pull compensation is automatically applied as part of your Auto Fabric settings. You can adjust it in the Object Properties docker. This is useful for fine-tuning designs depending on the type of fabric, backing, or topping being used.
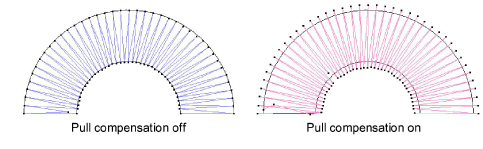
3Toggle automatic pull compensation on/off via the Pull Compensation button.
3With objects selected, right-click the Pull Compensation icon to change settings for those objects.
3With no objects selected, right-click the Pull Compensation icon to change current settings.
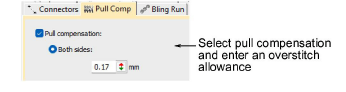
3Enter an overstitch allowance as required. By default, the same value is applied to both sides of a shape.
With double-sided Pull Compensation, you have greater control over embroidery quality and can achieve more reliable, polished stitch results.
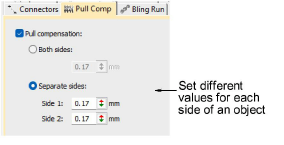
By setting separate compensation values for Side 1 and Side 2, you can avoid gaps, overlaps, and uneven stitch quality.
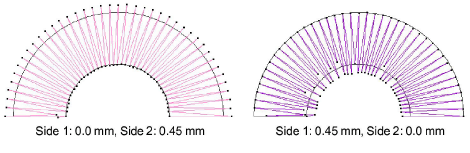
Double-sided Pull Comp is especially helpful when:
3One side of an object sits directly on the fabric. This tends to pull in more.
3The other side sits on top of an embroidery fill, which pulls less.

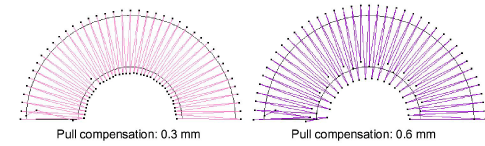
Appropriate settings vary with the type of fabric – stretchy, pile, etc – hooping method – tight or loosely hooped – and size of embroidery object – wide or narrow columns. Use the following table as a guideline.
|
Fabric |
Pull compensation (mm) |
|
drills, cotton |
0.20 |
|
T-shirt |
0.35 |
|
fleece, jumper |
0.40 |
|
lettering |
0.2 - 0.3 |
3Working with object properties
Products
EmbroideryStudio Add-ons
Solutions
Learning
Support
Connect
About Wilcom