|
|
Use Efectos de puntada > Refuerzo automático para fortalecer y estabilizar los diseños de bordado con los refuerzos automáticos. Haga clic derecho para configuración. |
|
|
Use Efectos de puntada > Refuerzo automático para fortalecer y estabilizar los diseños de bordado con los refuerzos automáticos. Haga clic derecho para configuración. |
EmbroideryStudio facilita una amplia selección de clases de refuerzo de los que elegir. Use sólo una capa de refuerzo, o para mayor soporte, combine dos clases de refuerzo. El refuerzo que usted escoja viene determinada por la forma y el tamaño del objeto, la clase tela y el propósito fin que debe cumplir. EmbroideryStudio le permite establecer valores que se adecúan a diferentes telas, la apariencia y el tamaño de las letras.
1Active o desactive los refuerzos con el botón Refuerzo automático.
3Sin objetos seleccionados, haga clic con el botón derecho en el icono Refuerzo automático para cambiar las configuraciones actuales.
3Con objetos seleccionados, haga clic con el botón derecho en el icono Refuerzo automático para cambiar las configuraciones para esos objetos.
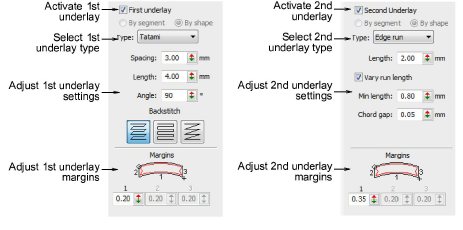
2Si no está todavía marcada, marque la casilla correspondiente al refuerzo relevante – primer y/o segundo – y haga su selección en el menú desplegable. Esto le permite aplicar refuerzos dobles a los objetos de diseño. Una combinación típica puede ser Corrido de borde con Tatami o Zigzag para objetos grandes. Como regla de oro...
|
Clase de refuerzo |
Finalidad |
|
|
|
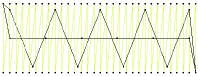
Úselo para estabilizar las columnas estrechas – p. ej., 2-3 mm de ancho. |
|
|
|
Úselo para estabilizar formas más o menos grandes tales como letras. |
|
|
|
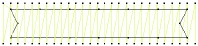
Use el bordado de refuerzo zigzag para estabilizar columnas anchas. Puede establecer las propiedades de longitud de puntada para el refuerzo zigzag. La longitud de puntada es la longitud de cada puntada zigzag. |
|
|
|
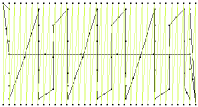
El refuerzo Tatami se emplea para estabilizar formas grandes rellenas. Se asemeja a una puntada de relleno tatami extremadamente abierta, en la cual se colocan hileras de puntadas a través del objeto para crear el soporte. |
|
3Trabajar con propiedades del objeto
3Establecer el refuerzo de letras
Productos
Complementos de EmbroideryStudio
Soluciones
Aprendiendo
|
Copyright ©2025 Wilcom Pty Ltd | Condiciones de uso | Política de privacidad |