|
|
Use Caja de herramientas > Puntada aplanda para generar un relleno de fondo liviano para aplanar la napa de telas texturizadas como la tela de toalla para su subsecuente bordado. |
|
|
Use Caja de herramientas > Puntada aplanda para generar un relleno de fondo liviano para aplanar la napa de telas texturizadas como la tela de toalla para su subsecuente bordado. |
La prestación Puntada aplanada genera automáticamente un relleno ligero para aplanar la pelusa de las telas texturizadas como la tela de toalla y las pieles de forma que no se pierda el bordado. La herramienta incluye un tipo de puntada dedicado que puede tener una (1) o dos (2) capas con espaciado, longitud y ángulo de puntada ajustables.
1Si desea crear un relleno aplanado para un diseño completo, sencillamente clique el icono Puntada aplanada. Alternativamente, seleccione un(os) objeto(s) específico(s) primero.
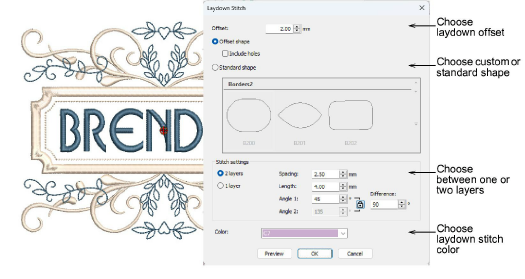
2Escoja un desplazamiento para el aplanado – p. ej. 2mm. Esto establece un margen entre el(los) objeto(s) seleccionados y el borde del diagrama.
3Escoja un estilo de aplanado:
3Si se selecciona Forma desplazada, un relleno aplanado será generado conforme al borde del diseño o de el(los) objeto(s) seleccionado(s). Opcionalmente, incluya agujeros si desea que la pelusa sea visible en las secciones no bordadas.

3Si Forma estándar está seleccionado, elija una en la galería de orlas.

Nota: Al usar Formas estándar, algunas formas irregulares pueden causar un desplazamiento mayor que el esperado. Una vez creada, puede seleccionar y redimensionar la forma al tamaño deseado.
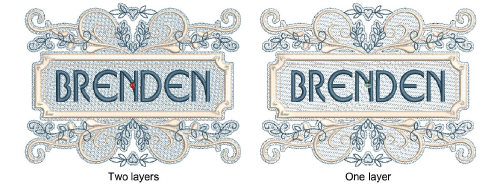
4Elija el número de capas que desea incluir en el relleno de aplanar. Esto dependerá de la densidad de la pelusa de la tela.
Idea: Clique Vista previa para generar el relleno sin cerrar. Mueva el panel diálogo como sea necesario. Insista hasta que quede contento con el resultado.
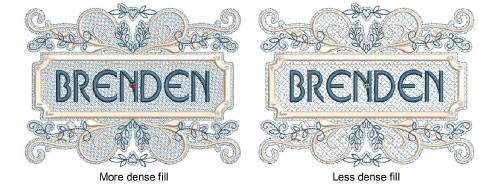
5Ajuste las configuraciones de espaciado y longitud para un relleno más o menos denso. Esto también dependerá de la densidad de la pelusa.
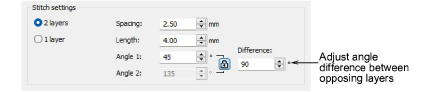
Nota: Si se selecciona 2 capas, la segunda capa se bordará con las mismas configuraciones de puntada de la primera pero con el ángulo de puntada determinado por Ángulo 2.
6Opcionalmente, establezca configuraciones de ángulo opuestas si está usando dos capas de bordado. Lo determinado es 90° (perpendicular).
Idea: Los ángulos de la Puntada aplanada pueden ajustarse en cualquier momento mediante la pestaña Propiedades del objeto > Relleno. La configuración Ángulo de puntada en la pestaña Bordado no tiene efecto en la Puntada aplanada.
7Escoja un hilo de Puntada aplanada en la lista desplegable Color. En general, deseará que el relleno aplanado se mezcle con la tela utilizada. Alternativamente, si escoje una forma de orla estándar por ejemplo, puede desear resaltar la forma con un color contrastante.
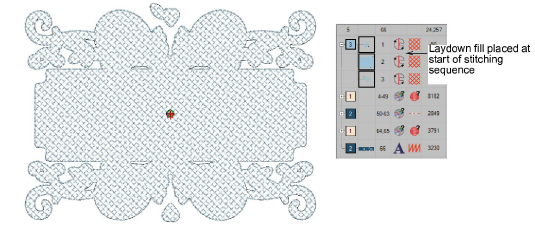
8Clique Aceptar para confirmar y regenerar. El objeto de aplanado resultante se coloca al comienzo de la secuencia de bordado.
3La Puntada de aplanar ignora las formas de motivo al generar bordado para los contornos de motivo o las orlas en los objetos de monogramas. En su lugar, el bordado se genera con base en el contorno del objeto. Puede necesitar redimensionar manualmente para obtener el resultado que desea.
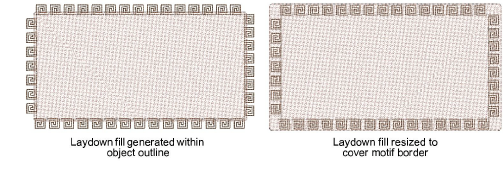
3Determine dónde se ubica el motivo en la línea digitalizada y mida la distancia al borde externo del motivo. Use este valor para ajustar el desplazamiento de la puntada de aplanar para asegurar de que cubre el contorno del motivo.

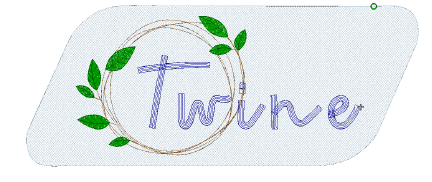
3La Puntada de aplanar puede también aplicarse a las colecciones de diseño de teclado. Sin embargo, no siempre le dará el efecto deseado, particularmente si las letras contienen muchos espacios abiertos. A veces puede aumentar el desplazamiento de la Puntada de aplanar para obtener el efecto deseado.
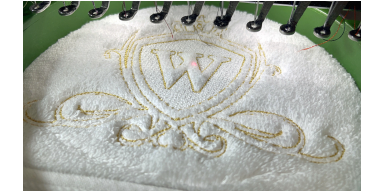
3El refuerzo puede usarse por sí solo como una ‘puntada evitada’. Aquí vemos como la puntada de Aplanar se usa para formar el fondo mientras la tela de toalla sobresale formando parte integral del diseño, similar a Felpilla. Contornos sencillos enmarcan el resto del diseño.
3Usar las CDT como fuentes de bordado
Productos
Complementos de EmbroideryStudio
Soluciones
Aprendiendo
|
Copyright ©2025 Wilcom Pty Ltd | Condiciones de uso | Política de privacidad |
