|
|
Haga clic derecho en Efectos de puntada > Refuerzo automático para ajustar las configuraciones del refuerzo tatami. |
|
|
Haga clic derecho en Efectos de puntada > Refuerzo automático para ajustar las configuraciones del refuerzo tatami. |
El refuerzo Tatami se emplea para estabilizar formas grandes rellenas. Se asemeja a una puntada de relleno Tatami extremadamente abierta, en la que las filas de puntadas se colocan a través del objeto para crear un refuerzo. El refuerzo Tatami se emplea con frecuencia junto con Corrido de borde, especialmente para objetos de Relleno complejo debajo del bordado de cobertura tatami.
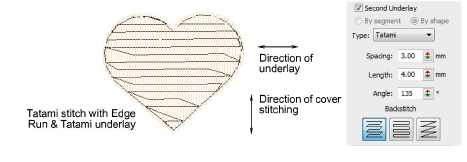
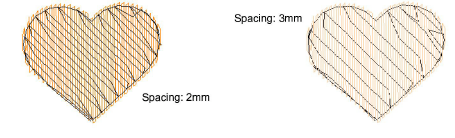
3Cambie las configuraciones de espaciado y longitud de puntada para refuerzo Tatami del mismo modo que para las puntadas de relleno de Tatami.
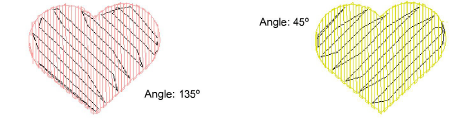
3Seleccione la clase de pespunte que necesita y, para objetos de Relleno complejo establezca el ángulo de puntadas de refuerzo. El ángulo de puntada del refuerzo debe ser opuesto al de las puntadas de cobertura.
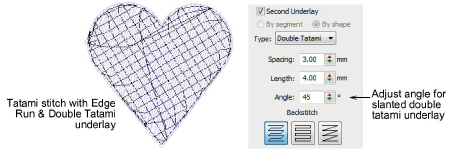
3Para soporte extra con telas muy suaves o elásticas, pruebe a usar Tatami doble en combinación con Corrido de borde. Ajuste el ángulo de puntada de forma que el Tatami doble provea inclinación simétrica en las direcciones hacia adelante y hacia atrás. Esto debería resultar en un efecto de ‘trama cruzada’. Además, puede dar una superficie con relieve similar a ‘bordado de borla’.
Idea: Aumente este margen para impedir que las puntadas de refuerzo se extiendan fuera de las puntadas de cobertura.
3Otras configuraciones de tatami
3Opciones de aplicación de propiedad de objeto
Productos
Complementos de EmbroideryStudio
Soluciones
Aprendiendo
|
Copyright ©2025 Wilcom Pty Ltd | Condiciones de uso | Política de privacidad |
