|
|
Haga clic con el botón derecho en Efectos de puntada > Refuerzo automático para seleccionar la clase de refuerzo que desea aplicar a los objetos ramificados. |
|
|
Haga clic con el botón derecho en Efectos de puntada > Refuerzo automático para seleccionar la clase de refuerzo que desea aplicar a los objetos ramificados. |
 Debido a que Ramificación combina objetos para formar un solo objeto ramificado, es posible que pueda aplicar un solo refuerzo a todo el objeto. La técnica funciona bien con objetos Columna A o Columna B.
1Seleccione el objeto bifurcado y haga clic derecho en Refuerzo automático.
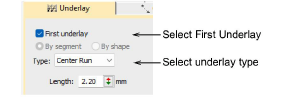
2Seleccione la casilla Primer refuerzo y seleccione una clase de refuerzo.
3Opcionalmente, agregue un segundo refuerzo.
4Pulse Intro o haga clic en Aplicar. Las puntadas de refuerzo se generan automáticamente para el objeto ramificado.
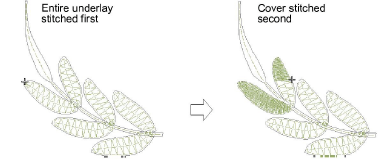
Nota: Si los objetos componentes se tocan o traslapan, el refuerzo se borda en primer lugar en todo el objeto ramificado, seguido por la puntada de cobertura.
3Visualizar secuencia de puntadas
Productos
Complementos de EmbroideryStudio
Soluciones
Aprendiendo
|
Copyright ©2025 Wilcom Pty Ltd | Condiciones de uso | Política de privacidad |
