Puede guardar archivos en el formato CND de Melco desde EmbroideryStudio. Algunas características de calidad de puntada, tipos de puntadas y rellenos y efectos decorativos no se convierten bien. Si tiene intención de guardar un archivo en formato CND, debería usar únicamente métodos de entrada, tipos de puntada y efectos que sean compatibles con el software EDS-III de Melco.
Las máquinas compatibles con Superstar no tienen recortadores. Si desea bordar un diseño en una máquina sin recortadores, establezca los valores de la máquina para no sacar códigos de Recorte. Después digitalice el diseño para recortarlo manualmente. Las versiones iniciales de CND no soportan los códigos de recorte de Melco. En este caso, establezca los valores de formato de máquina para sacar Recortes como Saltos.
Cuando usted guarda en formato CND, tiene que especificar cómo convertir las puntadas ondulantes de tatami. Los objetos con puntadas Tatami curvas – p.ej. objetos de la Columna A – no son admitidos por las versiones anteriores del formato CND. Para máquinas compatibles con Superstar, las puntadas ondulantes de tatami se convierten simplemente en puntadas de Camino, el equivalente EDS de Manual. Para máquinas más antiguas, los rellenos tatami ondulantes han de convertirse en tatami normales – es decir, con un único ángulo de puntada – luego en relleno normal, el equivalente EDS de Tatami normal.
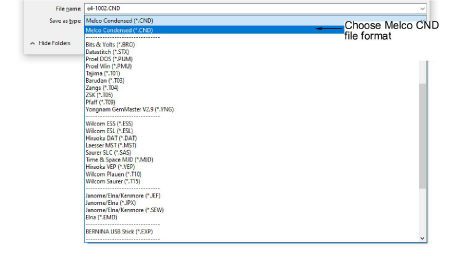
1Seleccione Archivo > Exportar archivo de máquina. Se abrirá el diálogo Exportar diseño.
2Seleccione Melco CND de la lista Archivos de clase.
3Introduzca un nombre para el diseño en el campo Nombre de archivo.
4Haga clic en Opciones. Se abrirá el diálogo Opciones de guardar.
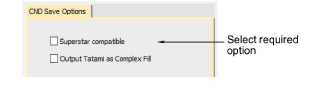
5Seleccione la opción requerida para convertir rellenos de Tatami ondulante:
|
Opción |
Función |
|
Superstar Compatible |
Convierte Tatami ondulante en Walk (equivalente EDS de Manual). Relleno complejo Tatami se saca como Relleno normal (equivalente EDS de Tatami). Las máquinas compatibles con Superstar no tienen recortadores. |
|
Sacar Tatami como Relleno complejo |
Convierte Tatami ondulante a Tatami normal – es decir, con un ángulo individual de giro – luego en Relleno EDS Normal. |
Nota: Estas funciones también están disponibles cuando envía un diseño CND para bordar.
6Haga clic en Aceptar, y después en Guardar.
3Conversión de formato Melco CND a Wilcom EMB.
Productos
Complementos de EmbroideryStudio
Soluciones
Aprendiendo
|
Copyright ©2025 Wilcom Pty Ltd | Condiciones de uso | Política de privacidad |