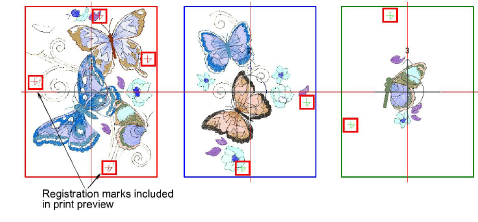
Para alinear encuadres consecutivos al bordar, puede incluir marcas de registro para cada encuadre. Dos juegos de marcas se generan en las áreas traslapadas de cada encuadre consecutivo. Un juego aparece como las puntadas finales del encuadre precedente. El siguiente juego se incluye como las primeras en el encuadre subsiguiente. Estas puntadas no forman parte del diseño y no se guardan en el archivo de diseño. Sin embargo, se añaden al producir y están visibles en la vista previa de encuadres y en la hoja de trabajo.
Idea: Se requiere algo de práctica para alinear los diseños con encuadres múltiples de manera correcta. En Internet se encuentran programas de capacitación de terceros que demuestra la técnica correcta. La mayoría recomiendan usar un estabilizador ‘sticky-back tear-away’, lo suficientemente pesado para que las marcas de registro no lo rompan. Use alfileres a través de las marcas de registro de un encuadre para alinear las marcas correspondientes del siguiente encuadre.
1Abra o cree el diseño grande o esquema de diseños que desea bordar.
2Haga clic en el icono Opciones de encuadres múltiples. Se abre la pestaña Opciones > Encuadres múltiples.
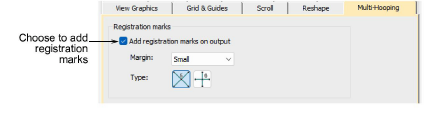
3Marque Añadir marcas de registro a la salida y defina un margen. Entre más grande el margen, mayor la distancia entre la marca de registro y el área de bordado máxima del aro. Esto facilita la alineación pero puede disminuir en algo la precisión de su registro.
4Escoja su tipo de marca de registro preferido – 5-puntos o 6-puntos. Las marcas de 5 puntos funcionan con la mayoría de las máquinas y son fáciles de eliminar. Las marcas de 6 puntos son más robustas. Pueden también usarse si la máquina no puede bordar la marca de 5 puntos.
5Use la herramienta Vista previa de encuadres para verificar que las marcas de registro hayan sido añadidas. Haga clic y mantenga para aislar el encuadre en la ventana de diseño. Las marcas rojas indican el final de un encuadre, las verdes el inicio del siguiente.
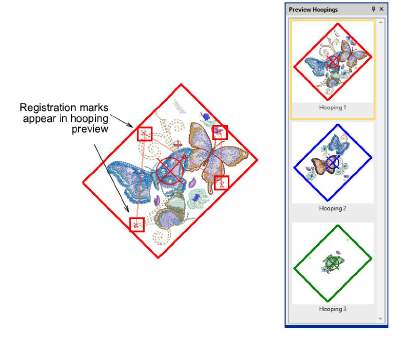
Las marcas de registro también se muestran en la lista de encuadres en Secuencia de encuadres y en las hojas de trabajo Miniaturas de encuadres.
3Como las marcas de registro no son parte permanente del diseño, no pueden moverse. Ajustando las posiciones de aro y usando Calcular encuadres, puede cambiar donde se colocan las marcas de registro en las posiciones de aro traslapadas.
3Use la marca de registro de 5 puntos si es posible porque tendrá menos penetraciones de aguja.
3Corra una prueba en su máquina para ver cómo maneja las marca de registro. Verifique si...
3Los hilos se recortan
3Los hilos se halan antes de la marca de registro siguiente.
Nota: Algunas máquinas jalan el hilo más fuertemente que otras y por lo tanto la marca de registro de 5 puntos puede zafarse al moverse de un punto al siguiente. En ese caso, pruebe con la de 6 puntos.
3¿Aparecen todas las marcas de registro en la interfaz de máquina? Si no, cambie a la marca de 6-puntos. Ellas tendrán penetraciones de aguja adicionales porque su máquina añade amarres iniciales y remates. Esto no es algo que pueda evitar pero puede probar a desactivar los recortes en la máquina.
3Durante la producción, alinee las marcas de registro recientemente bordadas con las marcas en el estabilizador y adhiera la tela sobre la superficie engomada. Para ayudar, inserte alfileres a través del centro de las marcas de registro.
3Espejear y reflejar selecciónes
3Opciones de visualización de aro
Productos
Complementos de EmbroideryStudio
Soluciones
Aprendiendo
|
Copyright ©2025 Wilcom Pty Ltd | Condiciones de uso | Política de privacidad |

