|
|
Haga clic con el botón derecho en Apliqué > Apliqué para ajustar las configuraciones de puntada de hilván. |
|
|
Haga clic con el botón derecho en Apliqué > Apliqué sin agujeros para ajustar las configuraciones de puntada de hilván. |
|
|
Haga clic con el botón derecho en Apliqué > Apliqué para ajustar las configuraciones de puntada de hilván. |
|
|
Haga clic con el botón derecho en Apliqué > Apliqué sin agujeros para ajustar las configuraciones de puntada de hilván. |
El hilván se usa para fijar las formas de apliqué a una tela de fondo antes de aplicar las puntadas de cobertura. Puede ajustar las configuraciones u omitir esta capa por completo. También puede especificar un movimiento de bastidor fuera para recortar el pedazo de apliqué.
1Haga doble clic en los objetos de apliqué para acceder a las propiedades del objeto.
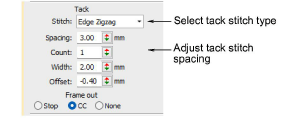
2En el panel Hilván, seleccione una clase de puntada de hilván. Alternativamente, seleccione Ninguno.
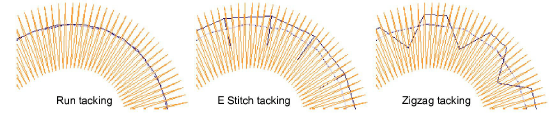
3Ajuste la configuración de la puntada de hilván de acuerdo con el tipo de puntada seleccionado:
|
Opción |
Función |
|
Longitud |
O valor de longitud de puntada para puntada Corrido. |
|
Corridos |
Puntada E solamente. Número de corridos entre puntadas. |
|
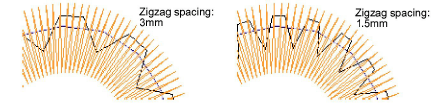
Espaciado |
Valor de espaciado de puntada para Puntada E y Zigzag. |
|
Número |
Número de repeticiones de puntada, sólo para Zigzag. |
|
Anchura |
Valor de anchura de columna para Zigzag y Puntada E. |
|
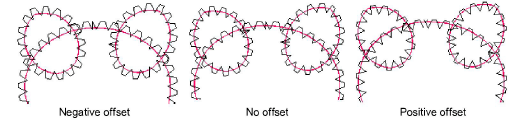
Desplazamiento |
Sólo puntada Corrido. Un valor de desplazamiento negativo mueve las puntadas de hilván dentro del contorno, un valor positivo lo mueve afuera. |
4Opcionalmente, ajuste Desplazamiento. Un desplazamiento negativo mueve el hilván hacia dentro en relación con el corrido de guía. Un valor positivo lo mueve hacia afuera.
5Opcionalmente, establezca un Bastidor fuera después de hilvanar para recortar el parche apliqué. Dependiendo de la máquina con la que esté trabajando - de cabezal múltiple o sencillo - el comando bastidor fuera debe especificarse como una función de Parada o de Cambio de color respectivamente.
Productos
Complementos de EmbroideryStudio
Soluciones
Aprendiendo
|
Copyright ©2025 Wilcom Pty Ltd | Condiciones de uso | Política de privacidad |

