|
|
Use Administrar diseños > Imprimir selección para imprimir los diseños seleccionados en la Biblioteca de bordados. |
|
|
Use Administrar diseños > Imprimir selección para imprimir los diseños seleccionados en la Biblioteca de bordados. |
Puede imprimir hojas de trabajo para los diseños seleccionados e incluir miniaturas de cada uno en la hoja de trabajo. A diferencia de Imprimir diseño, esta opción puede proporcionar información sobre el diseño y el bordado.
1Seleccione y ordene los diseños a imprimir usando Ordenar.
2Seleccione un diseño y haga clic en el icono Imprimir selección. Se abrirá el diálogo Imprimir diseño.
3Para personalizar la impresión, haga clic en Opciones.
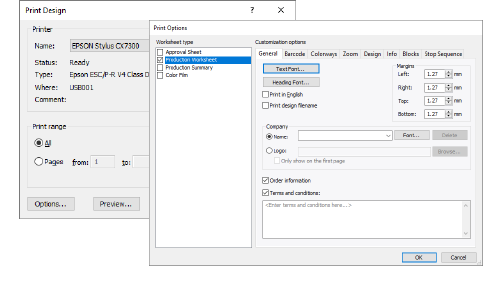
4Establezca las opciones del informe de diseño para que muestre la información que desea en el formato que requiere.
|
Opción |
Función |
|
Hoja de aprobación |
Este informe está destinado al cliente, no al personal de la producción. El cliente puede ver lo que ha pedido y así dar su aprobación. |
|
Hoja de trabajo de producción |
Está destinada al personal de producción. Se proporciona toda la información relacionada con la producción, como la longitud de la bobina, el tamaño del diseño, la tela de la prenda, etc. |
|
Resumen de producción |
Este informe proporciona dos tablas de resumen del diseño y las combinaciones de color asociadas – una tabla de Resumen de las combinaciones de color junto con una tabla de Resumen de la tabla de diseño. |
|
Patrones de apliqué |
Muestra los patrones de apliqué – información de corte – aparte del diseño. Se puede usar como una guía para cortar las piezas de tela. También muestran cuáles piezas de apliqué deben incluirse. |
|
Película de color |
Proporciona una lista de colores en el diseño, junto con información de color y de puntada para cada capa de color. Ayuda al operador de la máquina a visualizar cada color de puntada en orden de bordado. |
5El panel Tipo de hoja de trabajo provee opciones para ulterior personalización.
6Haga clic en Aceptary verifique la correcta configuración de la impresora en el diálogo Configuración de impresión de MS Windows®. El diálogo y la configuración disponible variarán de una impresora a otra. Consulte su manual de impresora para más información.
3Personalizar reportes de diseño
Productos
Complementos de EmbroideryStudio
Soluciones
Aprendiendo
|
Copyright ©2025 Wilcom Pty Ltd | Condiciones de uso | Política de privacidad |
