|
|
Use Estándar > Opciones para acceder a la opción quiosco de la aplicación y a otras configuraciones. |
|
|
Use Estándar > Opciones para acceder a la opción quiosco de la aplicación y a otras configuraciones. |
Al igual que la carpeta ‘Diseño’ del quiosco, el pendón predeterminado del quiosco está ubicado en la estructura de carpetas de EmbroideryStudio. Si desea modificar el pendón de alguna forma – p.ej., con el nombre de un lugar específico – acceder al pendón y modificarlo es una cuestión sencilla. Alternativamente, puede colocar su pendón en una ubicación separada en su disco duro o en la red y referenciarlo allí. Si tiene configurado más de un quiosco, todos pueden hacer referencia al mismo pendón.
1Navegue a la carpeta ‘Quiosco’ de su instalación de EmbroideryStudio:
C:\Program Files\Wilcom\EmbroideryStudio 2025\Kiosk
Allí encontrará el pendón de quiosco predeterminado – dimensiones 1200 x 100 píxeles.

2Personalice el pendón como requiera:
3Reemplace la imagen actual por una de las mismas dimensiones.
3Edite el pendón actual en cualquier programa de gráficos y guárdelo en la misma ubicación.
3Copie el pendón a la misma u otra ubicación y edítelo como desee.
Si mueve el pendón a otra ubicación, debe actualizar las configuraciones del software como sigue:
3Haga clic en el icono Opciones o seleccione Configuración > Opciones. Haga clic en la pestaña Quiosco.
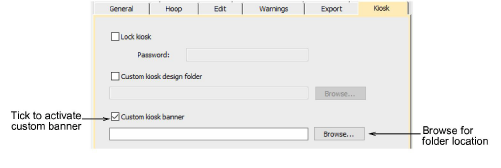
4Marque la opción Pendón de quiosco personalizado y explore en busca de la carpeta en su dispositivo de disco local o en la red.
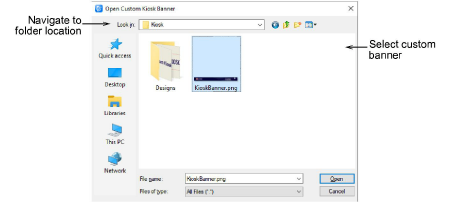
5Seleccione el archivo del pendón personalizado y haga clic en Abrir. Este se convierte en el pendón predeterminado al cual hará referencia el quiosco.
Productos
Complementos de EmbroideryStudio
Soluciones
Aprendiendo
|
Copyright ©2025 Wilcom Pty Ltd | Condiciones de uso | Política de privacidad |
