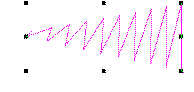
Aplicar puntada satín con espaciado fijo
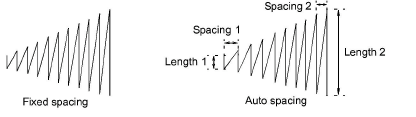
En EmbroideryStudio, Espaciado automático se activa para la mayoría de los tipos de objeto. Para la mayoría de los fines, esta opción evita las roturas de hilo y crea columnas de puntadas satín que resultan atractivas visualmente. A veces, no obstante, puede que quiera controlar el espaciado exacto de las columnas de satín. El espaciado fijo se usa a veces, por ejemplo, para efectos decorativos – por ejemplo, para un espaciado muy abierto sobre un fondo, pongamos por ejemplo, de tatami. Efectos de esta clase no pueden lograrse con Espaciado automático.
Idea: Si usa una tableta digitalizadora, puede alternar rápidamente entre estilos predeterminados con diferentes configuraciones de espaciado. Cada botón del Puck (ratón digitalizador) da acceso al siguiente estilo predeterminado. Por ejemplo, al pinchar en el botón 1 se accede a <PRESET_SATIN_1>.
Para aplicar puntada satín con espaciado fijo...
1Seleccione un método de digitalización, seleccione Satín, y cree su objeto de bordado. Alternativamente, seleccione un objeto existente de bordado y haga clic en Satín.
2Haga clic derecho en el icono Satín para acceder a las propiedades del objeto.
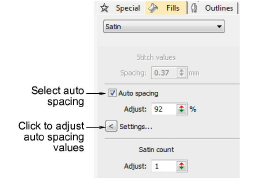
3Deseleccione Espaciado automático
4En el campo Espaciado, ingrese un espaciado fijo:
3Para aumentar la densidad, introduzca un valor más pequeño.
3Para reducir la densidad, introduzca un valor mayor.
Idea: División automática se usa principalmente para impedir puntadas largas en columnas amplias. Puede usarse también como alternativa al relleno tatami. División automática se parece más a Satín y funciona bien con puntadas ondulantes, creando líneas suaves y un poco más de profundidad. Por el contrario, tatami es plano y puede mostrar patrones no deseados con curvas cerradas.
Temas relacionados...
3Digitalizar bordado
3Optimizar las puntadas satín largas
3Satín de realce