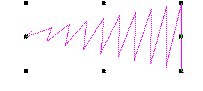
Si una forma Satín es demasiado ancha, las puntadas pueden estar flojas o no cubrir apropiadamente la tela. Y al contrario, en columnas estrechas, la densidad de puntada puede ser demasiado alta, y las penetraciones de la aguja pueden dañar la tela. Ajuste la densidad de puntada estableciendo un valor de espaciado fijo, o deje que Espaciado automático calcule los espaciados para usted allí donde las columnas cambien de anchura.

1Seleccione un método de digitalización, seleccione Satín, y cree su objeto de bordado. Alternativamente, seleccione un objeto existente de bordado y haga clic en Satín.
2Haga clic derecho en el icono Satín para acceder a las propiedades del objeto.
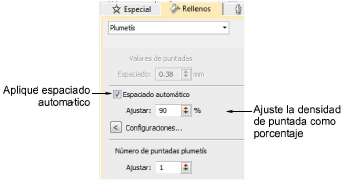
3Seleccione Espaciado automático si no está todavía marcado.
4Ajuste la Densidad de puntada para obtener rellenos más o menos abiertos.
La densidad se da como porcentaje de los valores predeterminados:
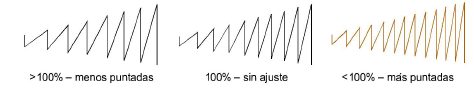
3Para disminuir la densidad de puntada, aumente el porcentaje – p.ej., hasta 110% -115%.
3Para disminuir la densidad de puntada, aumente el porcentaje – p.ej., hasta 90% -85%.
Un 75% normalmente produce bordados de alta calidad. Un número de puntadas aumentado implica que bordar el diseño llevará más tiempo y será más caro.
Nota: Para resultados más precisos, ajuste las configuraciones de Espaciado automático. Vea Espaciado automático de satín para más información.
Productos
Complementos de EmbroideryStudio
Soluciones
Aprendiendo
|
Copyright ©2025 Wilcom Pty Ltd | Condiciones de uso | Política de privacidad |

