 Use la herramientas Columna C o Digitalizar columna para digitalizar columnas de anchura y ángulo de puntada variable.
1Haga clic en el icono Columna C o Digitalizar columna.
2Seleccione un color y una clase de puntada – por ej. Satín.
3Digitalice la columna marcando puntos en lados alternos de la columna.
3Haga clic en el botón izquierdo para introducir puntos de esquina.
3Haga clic en el botón derecho para introducir puntos de curva.
Los puntos de control de un par dado no tienen por qué ser del mismo tipo. Por ejemplo, uno puede ser punto de esquina, y el otro, punto de curva.

Idea: Si se equivocara, pulse la tecla de Retroceso para eliminar el último punto. Pulse Esc para deshacer todos los puntos nuevos. Pulse Esc de nuevo para salir de la modalidad de digitalizar.
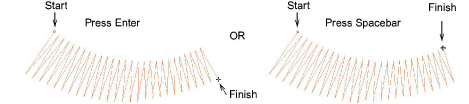
4Cuando haya terminado de digitalizar o bien...
3Pulse Intro para mantener la última puntada y colocar el punto de salida en el último punto que haya digitalizado, o
3Pulse la Barra espaciadora para omitir la última puntada y colocar el punto de salida en el lado opuesto de la columna.
Idea: Con el objeto seleccionado, haga clic en los botones Mantener/Omitir última puntada para alternar entre los dos.
Productos
Complementos de EmbroideryStudio
Soluciones
Aprendiendo
|
Copyright ©2025 Wilcom Pty Ltd | Condiciones de uso | Política de privacidad |


