|
|
Use Digitalización tradicional > Columna C para digitalizar columnas u orlas de anchura fija. Haga clic derecho para configuraciones. |
|
|
Use Digitalización tradicional > Columna C para digitalizar columnas u orlas de anchura fija. Haga clic derecho para configuraciones. |
Digitalice columnas y bordes de anchura fija con la herramienta Columna C.
1Inserte alguna ilustración artística para utilizar como trasfondo de digitalización.
2Seleccione un color y una clase de puntada – por ej. Satín.
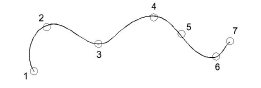
3Seleccione Columna C y marque los puntos de esquina o de curva alrededor del contorno de la forma.
3Haga clic en el botón izquierdo para introducir puntos de esquina.
3Haga clic en el botón derecho para introducir puntos de curva.
Idea: La configuración de Mostrar guía de anchura de Columna C en el diálogo Opciones activa un cursor especial. Es muy útil a la hora de digitalizar una orla basada en una imagen de plano de fondo.
4Para cerrar la forma, ingrese el último punto encima del primero.
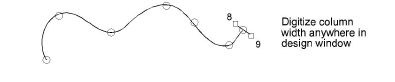
5Pulse Intro
6Especifique la anchura de columna.
3Para emplear la anchura predeterminada tal como está establecida en el panel acoplable Propiedades del objeto > Especial > Columna C, pulse Intro.
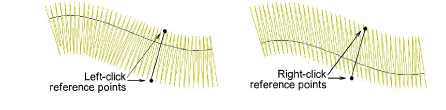
3Para especificar la anchura, marque dos puntos adicionales. Por defecto, las puntadas se colocan alrededor del centro de una línea digitalizada.
3Para especificar un desplazamiento, haga clic derecho en lugar de clic izquierdo en los puntos de referencia .
7Pulse Intro para acabar.
3Opciones de visualización de regla y guía
Productos
Complementos de EmbroideryStudio
Soluciones
Aprendiendo
|
Copyright ©2025 Wilcom Pty Ltd | Condiciones de uso | Política de privacidad |
