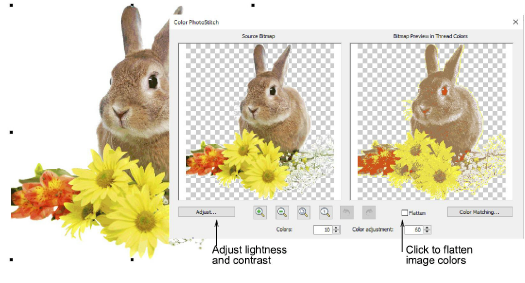
Analice la vista previa de puntadas. El diálogo provee varios métodos para ajustar la lista de hilos, empezando con los colores de la imagen. El objetivo es el mismo para cualquier foto – emplear el menor número de colores/hilos para lograr un buen resultado. Hay un punto de rendimientos decrecientes en que más colores no resultan en mayor claridad del diseño o facilidad de bordado.
1Use Aplanar para reducir la foto a bloques de color sólidos. Dependiendo de la calidad de la imagen – p. ej. baja resolución o imágenes pixeladas – se pueden afectar los detalles resulantes.
2Puede ajustar la claridad y el contraste de la imagen mediante Ajustar. Esto abre el diálogo Ajustar imagen. Empiece haciendo clic en Ajuste automático. Esto funciona bien para algunas fotos.
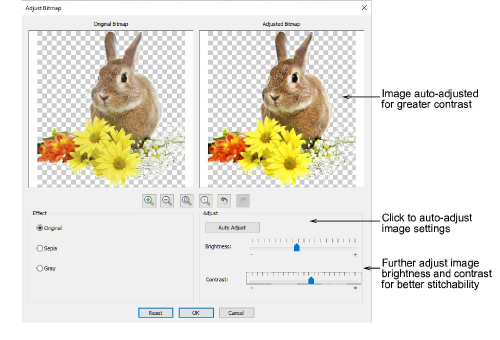
3Opcionalmente, en el panel Efecto escoja entre las variaciones de la imagen:
|
Opción |
Función |
|
Sepia |
En lenguaje fotográfico, ‘sepia’ se refiere al color marrón oscuro de las viejas fotografías impresas. Originalmente el proceso involucraba la adición de un pigmento hecho de tinta de calamar durante el revelado. |
|
Gris |
Las imágenes en escala de grises son aquellas compuestas exclusivamente de tonos de gris, desde negro en la intensidad más baja hasta blanco en la más fuerte. |
4Use el botón Restablecer para volver a los valores predeterminados. Use los botones Deshacer y Rehacer para recorrer ajustes anteriores.
5Haga clic en Aceptar para cerrar el diálogo. La lista de colores de hilo se actualiza en conformidad. Haga clic de nuevo en Vista previa para visualizar el resultado.
Productos
Complementos de EmbroideryStudio
Soluciones
Aprendiendo
|
Copyright ©2025 Wilcom Pty Ltd | Condiciones de uso | Política de privacidad |