3Desactive el trasfondo – pulse D – para una mejor visualización.
3Revise los resultados. Cosas para verificar:
3Bordes claramente definidos
3Conectores indeseados
3Cantidad de recortes
3Número de puntadas total.
3Si no está satisfecho, haga clic en Deshacer y pruebe de nuevo. Ensaye configuraciones diferentes y revise las vistas previas. Puede tener que retocar la imagen en PHOTO-PAINT si ninguno de los resultados es lo suficientemente bueno.
3Use imágenes con temas bien definidos o tonos que varíen constantemente.
3Tenga cuidado si después de procesar una imagen grande decide reducir el tamaño del diseño. Las puntadas pueden estar demasiado apretadas y hacer que las agujas se rompan.
3Limite la cantidad de redimensionamiento en EmbroideryStudio para mantener la mayor cantidad posible de información de la imagen.
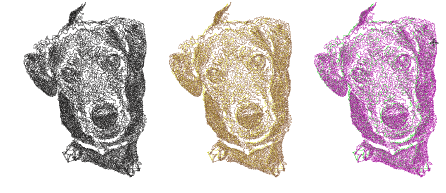
3Pruebe a combinar resultados diferentes con colores diferentes.
3Los efectos de posterización pueden producir buenos resultados en umbrales más bajos. En Corel PHOTO-PAINT, esto está disponible en Imagen > Transformar posterización.
3Intente aplicar filtros tales como Stucki, Jarvis y efectos Crosshatch.
3En Corel PHOTO-PAINT Stucki y Jarvis están disponibles en Imagen > Convertir a blanco y negro (1-bit). Ajuste la intensidad según sea necesario.
3Crosshatch está disponible en Efectos > Pinceladas de arte > Pluma y tinta.
3Se ofrece una técnica interesante aplicando un filtro de semitono. En la muestra de abajo, la imagen se separa en canales CMYK distintos y PhotoStitch de arrecife aplicado a cada uno. En Corel PHOTO-PAINT seleccione Imagen > Convertir a color CMYK y Imagen > Dividir canales en > CMYK.
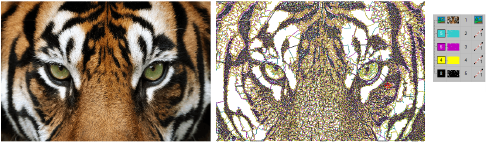
3Aunque originalmente creado para usarse con fotografías, PhotoStitch de arrecife puede también usar gráficos para crear bordados comercialmente atractivos.

3Insertar imágenes de mapa de bits
3Preparar fotos para la digitalización automática
3Preparar ilustraciones para la digitalización automática
Productos
Complementos de EmbroideryStudio
Soluciones
Aprendiendo
|
Copyright ©2025 Wilcom Pty Ltd | Condiciones de uso | Política de privacidad |