
Una vez que haya obtenido las configuraciones de color deseadas, pruebe a ajustar las configuraciones de puntada en combinación con Vista previa. Estas configuraciones le permiten obtener un equilibrio entre el número de puntadas total, el número de recortes y un cubrimiento óptimo: Siempre debe tratar de obtener un buen resultado con el número mínimo de puntadas y recortes.
1No hay ningún flujo de trabajo particular asociado con estos campos. La siguiente tabla resume la función de cada uno. Es cuestión de probar los valores junto con la Vista previa para llegar a un resultado satisfactorio.
|
Campo |
Función |
|
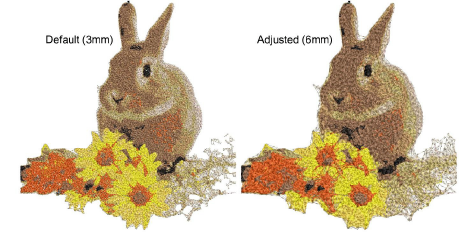
Longitud / Long. mín |
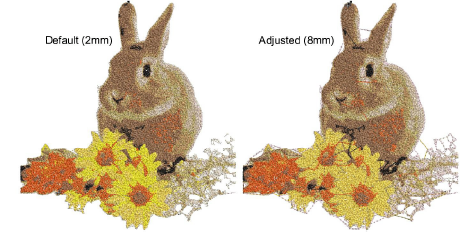
Los bloques de color de PhotoStitch a color son formados con puntadas de corrido. Las longitudes de puntada mínima y máxima permisibles en un diseño determinan los límites exteriores, en tanto que medidos entre los puntos de penetración de aguja. En general, cuanto más corta sea la longitud, más suaves serán las curvas, aunque sea a costo de un mayor número de puntadas. |
|
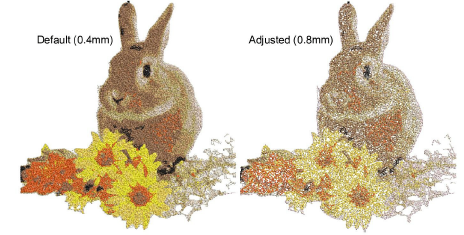
Espaciado |
Cuanto menor sea el valor, mayor será la densidad de puntada. Para obtener un bordado más abierto, emplee valores más grandes. |
|
Cubrimiento |
Esta configuración afecta la densidad general de la puntada. Porcentajes más bajos dan como resultado una cobertura menos densa. |
|
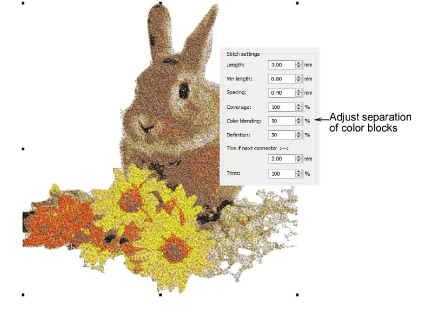
Mezcla de colores |
Esta configuración afecta a las áreas de color superpuestas. Aumentar este valor generalmente dará como resultado una mayor separación de bloques de color. |
|
Definición |
Esta configuración afecta la nitidez de los detalles de la imagen. Reducir este valor generalmente dará como resultado una mayor definición de la imagen. |
|
Recortar, si el próximo conector >= |
Se insertan recortes si el siguiente conector excede la longitud que usted especifica. |
|
Recortes |
Esta configuración afecta la cantidad de recortes y remates en el diseño. Reduzca el número de recortes aumentando la longitud del recorte y disminuyendo el ajuste del porcentaje de recorte, a expensas, sin embargo, de más tramos de conexión. |
2Por ejemplo, use la configuración Mezcla de colores para aumentar o disminuir los colores traslapados. Reducir este valor generalmente dará como resultado una mayor separación de bloques de color.
3Use Cubrimiento para ajustar la densidad de puntada total. Porcentajes más bajos dan como resultado una cobertura menos densa. Esto puede ser deseable para reducir el número de puntadas dependiendo del color de fondo.
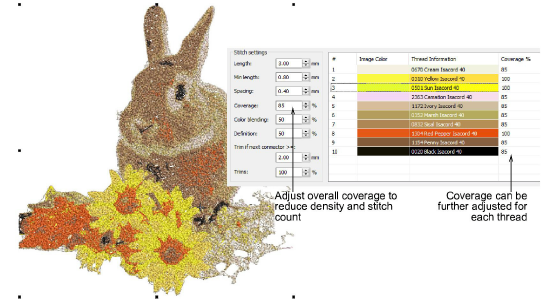
Nota: El cubrimiento puede ajustarse ulteriormente para cada hilo haciendo doble clic en un campo en la columna Cubrimiento. Se pueden usar valores diferentes para resaltar los detalles de primer plano o disminuir los colores de fondo.
4Ajuste las configuraciones de Longitud para mayor o menor precisión. Una longitud menor producirá un mayor detalle a costa de un número de puntadas mayor.
5Ajuste las configuraciones de Espaciado para mayor o menor densidad. De nuevo, un espaciado menor producirá mayores detalles a costa de un número de puntadas mayor.
Idea: Puede reducir el número de puntadas aumentando la longitud de puntada y el espaciado de puntada, reduciendo las configuraciones de cubrimiento individuales y total.
6Ajuste las configuraciones de recorte para más o menos recortes. Entre más alto el valor, mayor el número de conectores pero menor el de recortes.
7Siga experimentando hasta lograr el resultado deseado. Haga clic en Aceptar para confirmar.
Nota: Tanto el número de puntadas como el de recortes solo pueden verificarse después de cerrar el diálogo PhotoStitch a color. Mientras permanezca en la misma ventana de diseño, se mantienen las configuraciones actuales excepto el cubrimiento de hilo. Eso vuelve 100% al predeterminado. Anote esas configuraciones si desea regresar al diálogo de PhotoStitch a color.
Productos
Complementos de EmbroideryStudio
Soluciones
Aprendiendo
|
Copyright ©2025 Wilcom Pty Ltd | Condiciones de uso | Política de privacidad |