
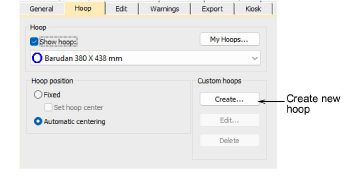
Click Hoop > Show Hoop to turn hoop display on or off. Right-click to change hoop settings.

Click Hoop > Hoop Options to configure hoop lists, change hoop position settings, and define custom hoops.
|
|
Click Hoop > Show Hoop to turn hoop display on or off. Right-click to change hoop settings. |
|
|
Click Hoop > Hoop Options to configure hoop lists, change hoop position settings, and define custom hoops. |
EmbroideryStudio allows you to define your own hoops and save for later use. Custom hoops are needed because new hoops become available for sewing machines more frequently than EmbroideryStudio is updated. Also some machines include hoop adapters for third-party hoops which need to be defined in EmbroideryStudio. You can edit and delete custom hoops at any time – both those you have defined yourself and those generated by Auto Hoop. Only custom hoops can be modified or removed, not those from the existing library.
1Right-click the Show Hoop icon. The Options > Hoop dialog opens.
2Click Create. The Create Hoop dialog opens.
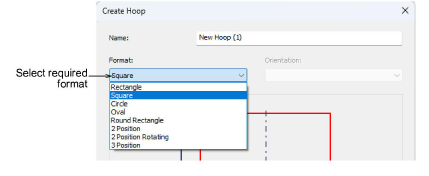
3Select the required format for your hoop from the droplist – e.g. rectangle, circle, etc.
4Give your hoop a meaningful title in the Name field – e.g. ‘Rectangle 180x120’.
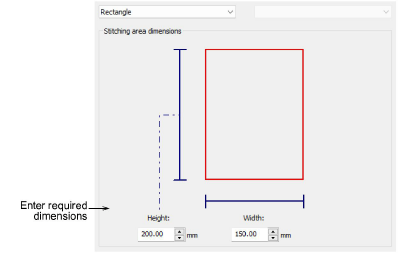
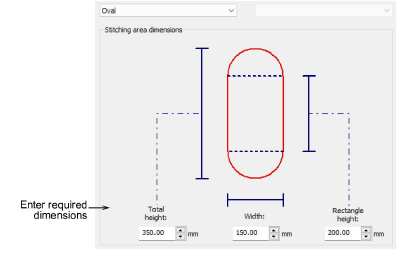
5In the Stitching Area Dimensions panel, enter the dimensional characteristics of the stitching area. For instance...
3Rectangle: Rectangular stitching areas require Height and Width dimensions.
3Oval: Oval stitching areas require three dimensions – Total Height, Rectangle Height, and Width.
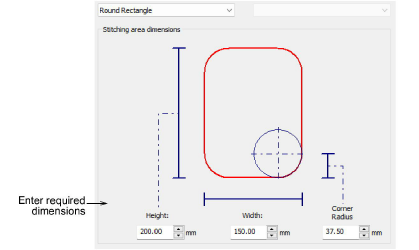
3Round Rectangle: Similar to oval stitching areas, round rectangles require three dimensions – Height, Width, and Corner Radius. The greater the radius, the rounder the corner.
Caution: Even if your unit of measurement is in inches, dimensions in the Create Hoop dialog are specified in millimeters. This is because hoops on the machine are specified in millimeters. If you are not sure of the hoop size in millimeters, check your machine manual. Sizes are generally listed in the machine parts and accessories list.
6Similarly, use the Create Hoop dialog to define multi-position hoops – 2 position, 2 position rotating, and 3 position. Again, use the Stitching area dimensions panel to enter dimensional characteristics of the stitching area. For instance...
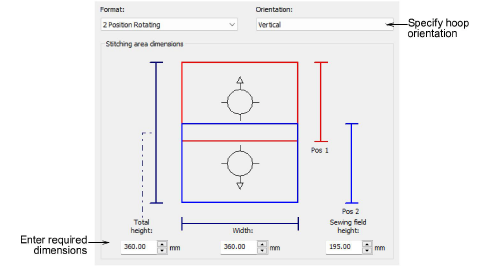
Tip: Two-position hoop formats also allow you to define hoop orientation – vertical or horizontal.
7Click Save Hoop to save your custom hoop to the hoop list.
3Once a new hoop is saved, it is available for use from the hoop droplist in the Options > Hoop tab.
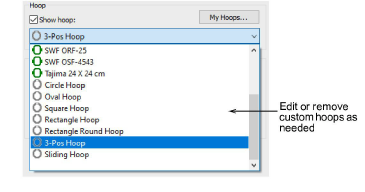
3When selected, custom hoops can be edited or removed via the available buttons in the Options > Hoop tab.
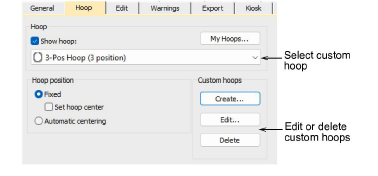
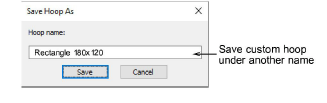
3When editing a custom hoop, the Save Hoop As option is available. Save the modified hoop under another name as preferred.
3If you open an EMB file which contains an unlisted custom hoop, or a listed hoop with modified settings, EmbroideryStudio creates a custom hoop and tags it with a system-generated name.
Products
EmbroideryStudio Add-ons
Solutions
Learning
About Wilcom
|
Copyright ©2025 Wilcom Pty Ltd | Terms of Use | Privacy Policy |