When checking the design, small errors are usually acceptable. Usually 0.3mm in real size is the smallest error the human eye can discern. Most old Schiffli machines cannot accurately make stitches smaller than 0.5-0.8mm in any case.
Tip: If, by mistake, the design is incorrectly sized or rotated, it is possible to change these parameters at a later stage. When scaling or rotating the design, all offsets will be properly placed in the final design. See Transforming Objects for details.
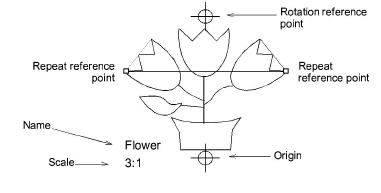
1Digitize two drawing reference points. See Digitizing Shapes for details.
2Digitize a horizontal stitch run between two repeat points. Make sure you digitize them accurately.
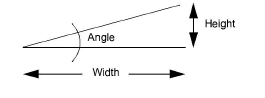
3Select the Run stitch object and check the dimensions in the Property Bar.

4Check the Height field to see that the value is equal to zero (0).
If the height value is not zero, then your design may not be positioned horizontally. There are three possible reasons:
You may have digitized the stitch run incorrectly. Delete the Run stitch object and try again.
You may have digitized the drawing reference points incorrectly. Re-define them and check again.
You may have marked the drawing reference lines incorrectly on your drawing. You need to check that the vertical line formed by the two reference points is really vertical compared to the rest of your design.
5Check the Width field to see that value is a multiple factor of your repeat in millimeters.
6To check or adjust the repeat size, select Design > Machine Format Settings > Advanced. See Needle spacing for details.
7Compare the Needle Spacing setting in millimeters with the width of your Run stitch object. If these settings are not the same:
you may have digitized your stitch run inaccurately
you may have entered your drawing scale incorrectly
your enlargement drawing may not have the proper enlargement scale – e.g. instead of 6:1 it may be 5.95:1.
8If you eliminate the first two reasons and you find that the drawing scale is the source of the difference, you can re-enter the drawing scale in the Digitizing Tablet dialog to match the real drawing scale. You can calculate this easily as:
New Drawing Scale = Old Drawing Scale × (X size of Run Stitch object ÷ mm value of Design Repeat)
|
Copyright ©2024 Wilcom Pty Ltd | Terms of Use | Privacy Policy |