|
|
Use Reshape > Reshape Object to add stitch angles to selected objects. |
|
|
Use Reshape Views > Show Stitch Angles to toggle stitch angle display when using the Reshape Object tool. |
|
|
Use Reshape > Reshape Object to add stitch angles to selected objects. |
|
|
Use Reshape Views > Show Stitch Angles to toggle stitch angle display when using the Reshape Object tool. |
Adjust or add stitch angles to embroidery objects interactively using the Reshape Object tool.
1Select the object.
2Click the Reshape Object icon and click Show Stitch Angles to view only these control points.

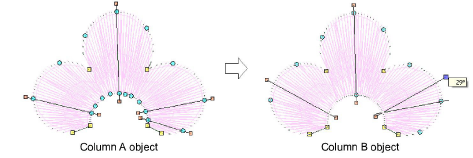
3Click-and-drag stitch angle points to adjust.

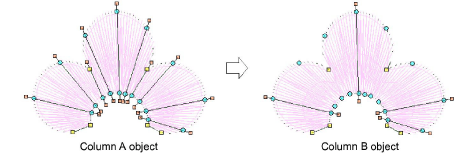
Tip: Column A objects automatically convert to Column B as soon as you add or adjust a stitch angle. You cannot add stitch angles to complex fill objects in Reshape mode.
4Holding down the Ctrl key, click the outline wherever you want to place an additional stitch angle.